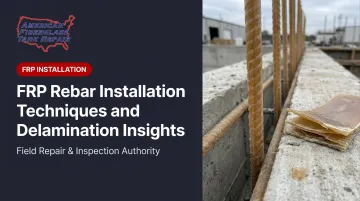
Key Takeaways
- FRP rebar cannot be bent on-site or cut with compression tools; both methods cause delamination
- All bends and hooks must be factory pre-fabricated; plan procurement well ahead of your installation window
- Support chairs must be placed at two-thirds the spacing used for steel rebar to prevent floating during pours
- Delamination from improper cutting can remain invisible externally while compromising tensile capacity
- Validate cut ends, chair spacing, and splice lengths before concrete placement — post-pour corrections aren't possible
Introduction
Most FRP rebar failures don't announce themselves. By the time a problem is visible, the concrete is already poured, cured, and load-bearing. The installation window is the only practical opportunity to get it right — and it's shorter than most crews expect.
FRP rebar follows the same general sequence as steel — prepare, position, tie, pour — but the material behaves differently enough that applying steel rebar practices directly is one of the most common sources of structural problems on FRP projects.
The composite nature of FRP rebar means errors that look minor on the surface can be anything but. Using the wrong cutting tool, for example, creates internal delamination with no visible external indication. The bar looks intact. It isn't.
This guide covers FRP rebar installation from site preparation through post-pour validation, with particular focus on delamination — the failure mode most likely to go undetected until it's too late to correct. The content draws on ACI 440.1R-15, ACI CODE-440.11-22, ASTM material standards, and manufacturer technical data from Hughes Brothers (Aslan 100 series).
Before You Begin: Prerequisites, Tools, and Safety
Standards and Material Checks
Before any bars reach the site, confirm your structural drawings specify FRP-specific provisions. ACI 440.1R-15 (Guide for the Design and Construction of Structural Concrete Reinforced with FRP Bars) and the more recent ACI CODE-440.11-22 (Building Code Requirements for Structural Concrete Reinforced with GFRP Bars) govern design and construction requirements — lap splice lengths, cover depths, and development lengths in these documents differ from ACI 318 steel provisions and cannot be substituted.
On delivery, inspect every bar before staging. Reject any bar showing:
- Fiber blooming or fuzzing at the surface
- Longitudinal matrix cracks
- Chalking or surface discoloration suggesting UV degradation
- Physical deformation from transport damage
Condition at delivery reflects storage history. ACI 440.1R-15 identifies UV radiation and moisture as the primary causes of polymer degradation in FRP reinforcement — bars stored under cover and away from prolonged sun exposure arrive in significantly better condition. If bars show surface degradation, consult the manufacturer before proceeding.
Required Tools Checklist
| Tool | Purpose | Notes |
|---|---|---|
| Circular saw with diamond-segmented or carbide-tipped blade | Primary cutting | Full RPM, steady pressure |
| Angle grinder with abrasive cutoff wheel | Field adjustments | Secondary option |
| Plastic zip ties or PVC-coated tie wire | Tying | Bare steel wire is prohibited |
| Plastic support chairs (wide-base) | Concrete cover maintenance | Must be rated for load |
| Permanent marker | Bar marking before cutting | — |
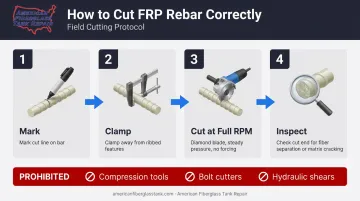
Prohibited tools: hydraulic shears, bolt cutters, and any compression-based cutting device. Per Hughes Brothers Aslan 100 technical data, GFRP bars should not be sheared.
Safety Requirements
Every cutting operation generates airborne glass fiber dust. NIOSH classifies fibrous glass as a hazard to eyes, skin, and lungs. Gear up before any cut:
- Wear an N95 respirator — glass fiber dust poses a respiratory hazard at any exposure level
- Use cut-resistant gloves; fiber slivers cause prolonged skin irritation
- Wear ANSI Z87.1-rated safety glasses for all cutting work
- Cover all exposed skin with long sleeves; fiber fragments collect quickly on bare arms
Before staging bars, verify work surfaces are level and free of sharp aggregate. Surface abrasion from rough staging areas can compromise the bar's resin matrix before installation begins.
How to Install FRP Rebar: Step-by-Step
Cutting FRP Rebar
FRP rebar is a thermoset composite — fibers locked in a cured polymer matrix. Compression-based tools crush this cross-section, fracturing the fiber-matrix bond and creating internal delamination that has no external indicator.
The correct cutting process:
- Mark the bar with a permanent marker at the cut line
- Clamp the bar away from ribbed surface features
- Cut at full RPM using a diamond blade — let the blade work, don't force it
- Inspect the cut end immediately for fiber separation or matrix cracking
Discard and recut any bar showing delamination at the cut end. In chemically aggressive environments — pH below 4 or above 12 — seal the cut end with a two-part epoxy sealant to prevent moisture ingress into exposed fiber ends.
Bending: Factory Pre-Fabrication Only
ACI 440.1R-15 states explicitly that an FRP bar cannot be bent after manufacture. Hughes Brothers confirms that bends are fabricated by shaping over molds or mandrels before the resin matrix cures. Field bending after cure causes catastrophic fiber rupture rather than the plastic deformation you'd see with steel.
All bends, hooks, stirrups, and curved sections must be ordered as factory pre-fabricated shapes. When submitting your bend schedule, include:
- Bar diameter and designation size
- Bend angle and inside bend radius (radius requirements are manufacturer-specific — Aslan fixed inside bend radii range from 38 mm for Size 2 to 76 mm for Size 8)
- Leg lengths for each shape
- Quantity per shape
Closed square stirrups are not available from Hughes Brothers. Specify U-bar pairs or continuous spirals instead, and note that maximum leg length for any bent shape is 5 ft.
Field curve exception: Aslan permits large-radius curves for specific product sizes. For example, Size 2 bars allow a minimum interior curve radius of 1,070 mm. This is product-specific — confirm with manufacturer documentation before attempting any field forming.
Laying, Tying, and Supporting the Cage
Tying materials: Use plastic zip ties, nylon ties, or PVC-coated wire. Bare steel wire introduces ferrous material into the corrosion protection strategy and can cause surface staining. When complete non-ferrous reinforcement is required, plastic bar clips are also acceptable.
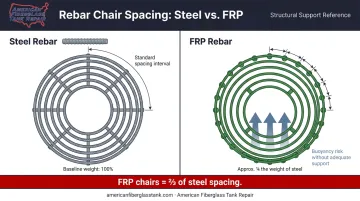
Chair spacing: Hughes Brothers specifies that support chairs for GFRP bars are required at two-thirds the spacing typically used for steel rebar. FRP bars are approximately one-quarter the weight of steel — the cage will float during concrete placement if chairs are spaced as they would be for a steel cage.
- Increase chair frequency beyond standard steel spacing — two-thirds the steel interval as a baseline
- Tie the top mat to formwork or stakes at regular intervals
- Verify chairs are rated for the concrete cover load before placement
Lap splice length: ACI 440.1R-15 uses FRP-specific development and splice provisions. Tension lap splice length under ACI 440.1R is 1.3 times the development length — this is not equivalent to steel splice formulas. Confirm all splice values with your structural engineer before proceeding.
Concrete Placement
Pour in lifts rather than full depth. The lighter FRP cage is more susceptible to upward buoyancy pressure from wet concrete, and staged pours reduce that risk.
Keep the internal vibrator away from direct bar contact. A 2021 peer-reviewed condition assessment of concrete and GFRP bars documented surface damage to bar ribs from vibrator contact — damage that directly reduces bond strength. Follow these vibrator practices to avoid it:
- Insert vertically and withdraw slowly
- Do not drag the vibrator across the reinforcement grid
- Maintain a minimum clearance from bar surfaces during consolidation
Delamination in FRP Rebar: What It Is and How to Prevent It
What Delamination Is
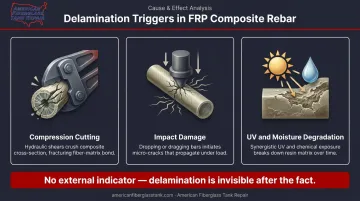
Delamination is the separation of layers within the composite matrix — a condition where the resin bond between fiber layers breaks down. In rebar applications, this is hazardous because a bar showing no external damage can be carrying significantly less than its rated tensile load if internal delamination is present. There is no reliable way to detect this visually after the fact.
Primary Causes During Installation
Three installation practices cause the majority of delamination events:
- Compression cutting — hydraulic shears or bolt cutters crush the cross-section, fracturing fiber-matrix bonds at the cut zone
- Impact damage — dropping or dragging FRP bars across hard surfaces or sharp aggregate initiates micro-cracks that propagate under structural load
- UV and moisture degradation — research on epoxy resin-based GFRP composites shows that UV exposure and aggressive media can work synergistically to damage the resin matrix and fiber phase, contributing to progressive degradation
Environmental Risk in Service
The chemical environment a structure will face matters at the specification stage, not after installation. Alkaline concrete pore solutions and direct chemical exposure can degrade the fiber-matrix interface over time if the resin system isn't matched to the exposure class.
This is especially relevant to AFTR's industrial clients: chemical plants handling sodium hypochlorite, sodium hydroxide, ferric chloride, and hydrochloric acid; wastewater treatment facilities; and waterworks operations all present aggressive service conditions that demand careful resin selection upfront.
A 2017 Composites Part B study comparing vinylester, polyester, and epoxy GFRP bars found that vinylester and epoxy systems showed the best mechanical retention and lowest degradation rates in aggressive conditions among the tested bar types. Resin selection should be confirmed with your structural engineer and manufacturer before procurement.
Prevention: What to Do Before Every Bar Goes Down
With the right resin confirmed and the environmental risks understood, installation practices are the final line of defense:
- Use rotary cutting tools only — no exceptions
- Inspect every bar before placement; reject anything showing fiber blooming, chalking, or longitudinal matrix cracks
- During transport and staging, keep bars off aggregate and hard edges to prevent surface micro-cracking
- Confirm the resin system is appropriate for the chemical environment the structure will face
- Do not use bars that have been stored in conditions causing visible surface degradation
Post-Installation Checks and Validation
Validation before the pour is the last practical opportunity to catch errors that will otherwise become permanent.
Baseline Visual Checks
Walk the entire cage before calling for concrete. Check:
- All cut ends for fiber separation or matrix cracking
- Chair spacing against specification — verify it follows two-thirds of steel spacing, not steel spacing
- All tying material is non-ferrous (no bare steel wire visible anywhere in the cage)
- Cover depths match structural drawings
- No bars show signs of surface damage or fiber blooming from site handling
Functional Checks
- Confirm lap splice lengths against the engineer's FRP-specific calculations
- Compare pre-fabricated bend and hook geometry against the original bend schedule
- Verify bars haven't shifted out of the concrete cover zone during cage assembly
When Visual Inspection Isn't Enough
External appearance cannot confirm the internal condition of FRP bars where delamination from compression cutting or impact may be present.
On projects where bars have been handled roughly or cutting practices were inconsistent, non-destructive testing provides the next layer of confidence. Methods worth knowing:
- Ultrasonic pulse velocity testing identifies internal voids and layer separation that visual inspection misses
- Laser and high-intensity backlight testing reveals conditions inside the structural body of the composite, not just at its surface
AFTR's inspection teams apply all three methods on FRP structural work. For high-specification industrial structures where deeper validation is warranted, consult an FRP specialist before the pour.
When Installation Should Not Proceed
Do not pour if:
- Delamination is visible at cut ends and cannot be resolved by recutting
- Chemical compatibility between the resin system and service environment has not been confirmed
- Concrete cover depth cannot be maintained at the specified value
- Bars show surface degradation suggesting significant UV or moisture damage
Common FRP Rebar Installation Problems
Delamination at Cut Ends
Problem: Fiber separation or matrix cracking visible at cut ends after cutting.
Cause: A compression-based tool was used, or the saw was forced at low RPM instead of allowed to cut freely at full speed.
Fix: Discard the affected section and recut using a diamond blade at full RPM. In aggressive chemical environments, seal the new cut end with two-part epoxy before placement.
Rebar Floating During Concrete Pour
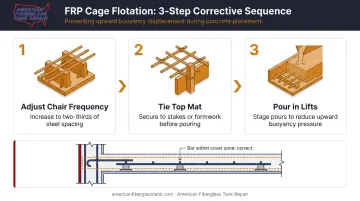
Problem: FRP cage migrates upward during placement, reducing cover depth.
Cause: Chair spacing copied from steel rebar practice without adjustment, or the top mat was not tied to formwork.
Fix:
- Increase chair frequency to two-thirds of steel spacing.
- Tie the top mat to stakes or formwork before pouring.
- Pour in lifts rather than full depth to reduce buoyancy pressure.
Insufficient Lap Splice Length
Problem: Lap lengths were calculated using ACI 318 steel formulas rather than ACI 440.1R FRP-specific provisions.
Cause: Standard steel design tables were applied without accounting for FRP's lower modulus of elasticity.
Fix: Verify all splice lengths against the structural engineer's FRP-specific calculations before the pour. There is no practical post-pour correction, so this must be confirmed before concrete placement.
Pro Tips for FRP Rebar Installation
Getting FRP installation right starts before the first crew arrives on site. These field-tested practices reduce rework, protect your resin investment, and keep long-term maintenance traceable.
Coordinate resin system selection with your exposure environment. For chemical plants, wastewater facilities, and applications involving sodium hypochlorite, caustic chemicals, or chlorides, vinylester or epoxy resin systems offer stronger resistance to alkaline attack and chemical degradation than standard polyester. Confirm compatibility against manufacturer chemical resistance data and your engineer of record before procurement.
Stage materials correctly before work begins. FRP components are sensitive to UV degradation and moisture absorption during extended outdoor storage. Keep materials covered, off the ground, and within the manufacturer's recommended storage window — then document storage conditions as part of your pre-installation checklist.
Build a complete installation record for every placement. Log resin type, lot numbers, storage duration, UV exposure period, and inspection results for each work zone. These records support future inspection programs and provide traceability if delamination concerns surface after the project closes.
Frequently Asked Questions
What is FRP rebar?
FRP rebar (Fiber Reinforced Polymer rebar) is a composite reinforcement bar made from high-strength fibers — typically glass, basalt, or carbon — embedded in a polymer resin matrix. It is used as a corrosion-resistant alternative to steel in concrete structures, particularly in chemically aggressive, coastal, or moisture-exposed environments.
Can you mix fiberglass and steel rebar in the same concrete structure?
Mixing FRP and steel rebar in the same structural zone is generally discouraged. The two materials have different moduli of elasticity, which affects load distribution and crack behavior. The engineer of record must confirm compatibility before proceeding.
Can FRP rebar be bent on-site?
No. FRP rebar is a thermoset composite ; attempting to bend it after curing causes catastrophic fiber rupture rather than plastic deformation. All bends, hooks, and stirrups must be ordered as factory pre-fabricated shapes with adequate lead time before your installation date.
What tools are required to cut FRP rebar?
Only rotary cutting tools are approved: a circular saw with a diamond-segmented or carbide-tipped blade, or an angle grinder with an abrasive cutoff wheel. Per Hughes Brothers Aslan technical data, GFRP bars should not be sheared — compression-based tools crush the composite cross-section and cause internal delamination.
How do you detect delamination in FRP rebar after installation?
Cut ends can be visually inspected for fiber separation and matrix cracking. Internal delamination from compression cutting or impact damage is often not visible externally; ultrasonic pulse velocity testing is used in critical applications to identify hidden voids that visual inspection would miss.
How long does FRP rebar last in concrete?
FRP rebar is corrosion-resistant and, when correctly installed, can extend the service life of concrete structures well beyond steel reinforcement. Research in Construction and Building Materials and 20-year field evidence from marine-exposed columns support long-term durability. Actual service life depends on resin type, exposure class, and concrete quality — consult your engineer and manufacturer for project-specific projections.