This work belongs to trained maintenance technicians familiar with FRP composites and resin systems. General mechanical contractors without experience in fiber-reinforced plastics regularly cause the failures they're called in to prevent.
The consequences of getting it wrong: flange face cracking, gasket blowouts, bolt-induced delamination, premature leaks, and unplanned system downtime in services where containment failure carries serious safety and environmental consequences.
This guide covers best-practice procedures for both FRP flange installation and field repair, following recognized industry standards including ASTM D5421, ASTM D4024, and ASME NM.2.
Key Takeaways
- Use full-face gasket contact, staged bolt torquing, and resin-compatible gasket materials — standard metallic installation methods don't translate to FRP
- Inspect flange faces, bolt holes, and laminate condition before any work begins
- Repair is viable for surface cracks and minor delamination; through-thickness cracks or bolt hole damage typically requires replacement
- Post-installation leak testing and torque re-verification after initial pressurization are both essential steps
- Uncertain structural integrity warrants a certified FRP specialist review before proceeding
FRP Flange Installation Guide
FRP flange installation follows a defined sequence: inspection, preparation, alignment, gasket setting, bolt torquing, and validation. RPS Composites notes that flanges represent the greatest design challenge among standard FRP piping components because the flange ring, hub, bolts, and gasket all interact using materials with fundamentally different properties. Skipping or rushing any stage is a leading cause of premature failure.
Prerequisites and Safety Considerations
Before any installation begins, confirm:
- The flange pressure rating matches system design requirements
- The flange face type (full-face vs. lap joint) is compatible with the mating component
- The resin system is chemically compatible with the service fluid — ASTM D5421 resin grades include epoxy, polyester, phenolic, vinylester, and furan; compatibility must be verified for the specific resin, not "FRP" generically
Critical mating flange check: Using a full-face FRP flange directly against a raised-face metallic flange is not recommended. RPS Composites states this configuration is likely to overstress the FRP flange during bolt-up. If this situation is unavoidable, a spacer ring must be inserted between the flange faces to eliminate the raised-face discontinuity.
Safety non-negotiables:
- Fully depressurize and drain the system before work begins
- Verify confined space protocols if working in enclosed areas
- Wear appropriate PPE: gloves, eye protection, respirator when solvents or resins are present
- Ensure adequate ventilation throughout
Do not proceed if: visible laminate defects exist on the new flange, pressure ratings are mismatched, or mating flange face configurations are incompatible without correction.
Tools and Materials Required
| Item | Notes |
|---|---|
| Calibrated torque wrench | Set to manufacturer's specified values — never use an impact wrench |
| Spirit level or laser alignment tool | Misalignment must be corrected at the support level |
| Full-face gasket | Match to service chemical and temperature requirements |
| Compatible bolting hardware | Non-metallic or coated fasteners to avoid galvanic stress on FRP |
| Cleaning solvent | Manufacturer-recommended for surface prep |
| Resin touch-up materials | Compatible with the original laminate system |
On impact wrenches: Diamond Fiberglass explicitly states that ratchet wrenches are acceptable but impact wrenches are not. This applies universally to FRP flange work. The sudden torque application from an impact tool will crack the laminate.
Bolt torque values for FRP flanges are significantly lower than metallic equivalents. Smith Fibercast's product data lists torque limits ranging from 20 to 200 ft-lb depending on flange classification. These are values considered hand-tight on a steel flange. Every torque specification is a hard limit.
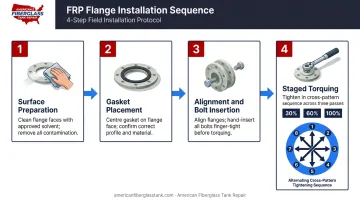
How to Install an FRP Flange: Step-by-Step
FRP flanges are sensitive to uneven bolt loading. The cross-bolt torquing pattern used in metallic flanges is even more critical here; uneven loading warps the flange face and cracks the laminate.
Step 1: Surface and face preparation Clean both flange faces with a manufacturer-recommended solvent. Inspect the laminate face for scratches, resin voids, or surface blemishes. For socket-end flanges being bonded, confirm the bond area is properly abraded for adhesion.
Step 2: Gasket selection and placement Select a full-face gasket that covers the entire flange face — not just the pipe bore area. Smith Fibercast specifies a 1/8 in. full-face gasket with 60–70 durometer hardness for flanges up to 14 in. diameter, and 1/4 in. thickness for larger sizes. Seat the gasket flat without folding or bunching.
Step 3: Alignment and bolt insertion Align the flange faces without forcing them together. Insert all bolts finger-tight before applying any torque. If the faces won't align without force, stop and correct the pipe run at the support level — forcing a misaligned connection transfers bending stress directly into the FRP.
Step 4: Staged torquing Apply torque in a minimum of three stages — typically 30%, 60%, then 100% of final torque — using a cross-bolt pattern. Final torque values must come from the flange manufacturer's specification or the applicable standard: ASTM D5421 for contact-molded flanges and ASTM D4024 for machine-made flanges.
Post-Installation Checks and Validation
Before pressurizing, verify:
- Even gasket compression is visible around the full flange face
- No whitening or cracking of the laminate around bolt holes (whitening indicates over-torque)
- Piping alignment has not introduced bending loads on the flange
For functional validation, perform a hydrostatic or pneumatic leak test at the system's design pressure. Ramp pressure gradually and hold for a defined duration, monitoring for pressure drop or visible leakage.
Re-torque after pressurization is not optional. Garlock's gasketing guidance identifies creep relaxation as a real mechanism that reduces bolt load over time, particularly with soft gaskets. Garlock recommends re-torquing 12 to 24 hours after start-up where safety procedures permit.
FRP flanges and soft gaskets compress under initial load. The re-torque pass compensates for that relaxation before the system enters sustained service.
FRP Flange Repair Procedures
Unlike metal flanges, which can be re-faced or re-welded, FRP flange repair requires manual lamination techniques, compatible resin systems, and proper cure conditions. Using the wrong materials doesn't restore the flange — it creates a weak zone that performs worse than the original damage.
Assessing Whether a Flange Needs Repair or Replacement
Use this decision framework before committing to a repair approach:
| Condition | Assessment |
|---|---|
| Hairline surface cracks in resin-rich face layer | Generally repairable |
| White or cloudy areas within the flange body | Closer evaluation required — may indicate delamination |
| Through-thickness cracks | Replacement warranted |
| Cracked bolt holes | Replacement warranted |
| Significant flange face distortion | Replacement warranted |
Inspection methods to use:
- Visual examination — look for discoloration, cracking, surface irregularities
- Tap testing — a hollow sound when tapping the flange body indicates voids or delamination beneath the surface
- Ultrasonic thickness testing — provides quantitative data on laminate condition where available
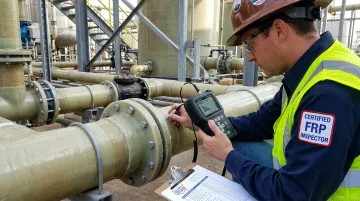
For flanges on systems handling hazardous chemicals, aggressive acids, or operating at elevated pressures, a certified FRP engineer or inspector should evaluate structural integrity before repair proceeds. AFTR's engineer-driven inspection services — supervised by Fiberglass Tank & Pipe Institute certified inspectors and using ultrasonic, laser, and high-intensity backlight testing — provide a reliable structural integrity checkpoint before repair decisions are finalized.
Step-by-Step FRP Flange Repair
Step 1 — System isolation and surface preparation Isolate, depressurize, and clean the flange completely. Mechanically abrade the damaged area by grinding or sanding to remove all degraded resin, delaminated layers, and surface contaminants. Feather the repair area edges to allow proper laminate overlap: a sharp boundary between repair and parent laminate creates a stress concentration point.
Step 2 — Damaged material removal Grind back to sound laminate. Any soft, discolored, or blistered material must be fully removed. Verify the remaining laminate is structurally sound by tap test before applying repair materials; if hollow spots appear beyond the intended repair boundary, expand the removal area.
Step 3 — Laminate repair application Apply a compatible resin matched to the original laminate system — polyester, vinylester, or epoxy — based on the service chemical requirements. Lay up glass reinforcement layers in stages; each ply must be fully wet out with no dry fibers or entrapped air.
AFTR works with custom-blended isophthalic and terephthalic polyester, vinylester, and epoxy resin systems matched to the specific service environment. A generic or mismatched resin applied to a flange in aggressive chemical service will not hold: the repair material must be compatible with both the parent laminate and the process fluid.
Step 4 — Post-cure and validation Allow full cure per the resin manufacturer's requirements before returning to service. Chemically aggressive service often requires a post-cure heat cycle for maximum chemical resistance. AFTR field crews carry temperature control equipment to manage this on-site regardless of ambient conditions. Follow up with a leak test before commissioning.
Common FRP Flange Problems and Fixes
Most FRP flange failures trace back to a small number of installation or maintenance errors. Catching them early limits how far damage spreads — and what repairs cost.
Leaking at the Flange Face
Problem: Joint leaks at the gasket face after installation or during service.
Likely causes:
- Insufficient or uneven bolt torque
- Wrong gasket type, size, or material
- Raised-face metallic mating flange used without a spacer ring
- Gasket material chemically incompatible with the service fluid
Fix:
- Re-torque bolts in a staged cross-pattern.
- If the leak persists, depressurize and separate the flanges to inspect the gasket.
- Replace with a compatible full-face gasket and verify the mating flange face configuration before reassembly.
Cracking or Delamination Around Bolt Holes
Problem: Whitening, cracking, or delamination of the laminate around one or more bolt holes.
Likely causes:
- Bolt torque exceeded the manufacturer's specification
- Hard metallic washers used without load-distributing backing plates
- Impact wrench used during installation
Fix: Stop torquing the moment cracking appears. Assess damage extent by tap test and visual inspection. A laminate patch can address minor resin cracking around bolt holes. If the bolt hole itself is structurally compromised, the flange requires replacement — no patch will restore the sealing and load-bearing capacity of a fractured bolt hole. Before the next installation, confirm torque values against the manufacturer's specification and update your procedure accordingly.
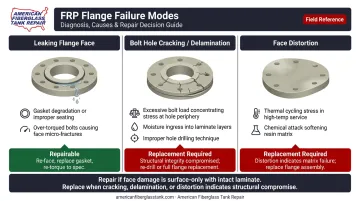
Flange Face Distortion or Misalignment-Induced Stress
Problem: Flange faces are bowed, warped, or unable to mate flat; or the joint shows visible angular or parallel offset between pipe runs.
Likely causes:
- Thermal cycling and differential expansion
- Pipe run installed under mechanical stress with the flange forced into position
- Inadequate pipe support creating sustained bending load on the flange
Fix: Do not force-tighten bolts to close a misalignment gap. Doing so transfers bending stress directly into the FRP flange body, which will absorb that load and fail before the bolt does. Correct the pipe run alignment at the support level first. For thermally induced distortion, assess whether the flange has exceeded its service limits before deciding between repair and replacement.
Pro Tips for FRP Flange Work
Flange work on FRP systems rewards patience and precision. These three practices separate repairs that hold long-term from those that come back.
Re-torque after 24 hours. After reaching final torque, wait a full day and run a second torque check across all bolts. Gasket creep and resin relaxation are normal in FRP — a final torque pass before the system enters sustained service is standard practice.
Document every flange joint completely. Record bolt torque values achieved, gasket material and dimensions, resin batch number used in any repair work, and full repair scope. In regulated industries like water treatment and chemical processing, this record is required for future maintenance cycles — not just useful.
Bring in a certified FRP specialist for anything outside your experience. When system chemistry, pressure conditions, or flange damage exceed in-house expertise, engage a specialist. FRP under bolt load and thermal cycling behaves differently from steel, and treating it like a metal flange repair leads to failures that are harder to diagnose and fix the second time.
Conclusion
The quality of FRP flange installation and repair determines the safety, chemical containment integrity, and service life of the entire piping system. In pressurized or corrosive service, a flange failure means a containment breach — with consequences that extend well beyond the fitting itself.
Thorough preparation, manufacturer-specified torque procedures, compatible material selection, and post-work inspection are what separate a flange joint that performs for decades from one that fails within months. When work scope, access conditions, or chemical service push beyond in-house capability, engaging certified FRP specialists — with experience across resins, laminates, and field conditions — is the most reliable path to a joint that holds.
Frequently Asked Questions
Can FRP flanges be repaired?
Yes, provided damage is limited to surface resin cracking, minor delamination, or gasket face degradation, repair is a viable option. Through-thickness cracks, fractured bolt holes, or significant face distortion typically require full flange replacement, as no laminate repair can return the flange to rated service conditions.
What causes FRP flanges to leak?
The most common causes are incorrect bolt torque (too low, too high, or unevenly applied), incompatible or degraded gasket material, mismatched flange face configurations (particularly raised-face metallic flanges mated without a spacer ring), and laminate damage that has compromised the sealing surface.
What gasket material should be used with FRP flanges?
Gasket selection depends on service chemical and temperature: EPDM for water and dilute chemical service, FKM for higher temperatures or aggressive chemicals, and PTFE-envelope gaskets for highly corrosive acid service. A full-face gasket is required across the entire flange face, as ring gaskets concentrate load and will overstress the FRP.
What bolt torque should be used for FRP flanges?
Torque values must come from the flange manufacturer's documentation or the applicable ASTM standard — Smith Fibercast's specifications, for example, list limits ranging from 20 to 200 ft-lb by flange classification. Over-torquing is one of the most common causes of laminate cracking at bolt holes.
How do I know when an FRP flange needs replacement instead of repair?
Replacement is warranted when bolt holes are cracked or structurally compromised, when delamination extends through a significant portion of the flange body, or when the flange face is distorted to the point where a full-face seal cannot be achieved. When in doubt, tap test the full flange body and consult a certified FRP inspector before proceeding.
What standards govern FRP flange design and installation?
Key standards include ASTM D5421 (contact-molded flanges), ASTM D4024 (machine-made flanges), ASME NM.2 (FRP piping systems), ASME RTP-1 (corrosion-resistant thermoset equipment), and ASME PCC-2 for post-service repair of pressure equipment. Always verify which standard applies to your flange type and service conditions before beginning work.