Who can realistically do this work? Trained FRP laminators or certified applicators familiar with peroxide-catalyzed resin systems and fiberglass substrates. In-house maintenance teams without that background frequently cause more damage than they prevent — applying incorrect catalyst ratios, skipping tack coat timing, or missing surface prep on nozzle areas where failure almost always starts.
When vinyl ester lining is applied incorrectly on FRP tanks, the consequences are specific: delamination at seams and overlaps, osmotic blistering from trapped moisture or residual solvents, incomplete cure from catalyst errors, and lining failures that accelerate the corrosion damage the work was meant to stop.
This guide covers the complete process — from pre-work assessment through post-installation validation — for anyone specifying, overseeing, or performing vinyl ester lining work on fiberglass tanks.
Key Takeaways
- Vinyl ester lining on FRP requires specialist-level preparation — not a standard coating job
- Surface prep means mechanical abrasion, not blasting; existing laminate condition must be assessed first
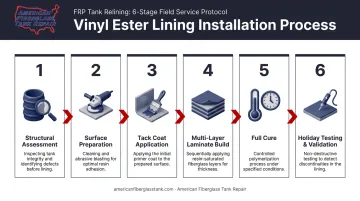
- Installation sequence: inspect → surface prep → tack coat → multi-layer laminate → cure → holiday test
- MEKP catalyst ratio, temperature, and humidity directly control cure quality; off-spec conditions cause permanent lining defects
- Spot repairs work when underlying FRP structure is sound — widespread delamination or structural damage requires full relining assessment
Why Vinyl Ester Is the Right Choice for Fiberglass Tank Linings
Chemical Compatibility with FRP Substrates
Vinyl ester resin is chemically compatible with the fiberglass laminate matrix used in FRP tank construction. As a resin system, it bonds chemically to existing FRP surfaces in a way that most epoxy coatings cannot replicate. This chemical affinity makes it the preferred lining material for fiberglass tanks storing aggressive chemicals. The new lining doesn't just mechanically adhere to the old surface — it integrates with the existing laminate structure.
Performance in Aggressive Chemical Service
Vinyl ester's strength is in oxidizing and high-acid environments where epoxy systems are chemically attacked. Manufacturer corrosion guides from Derakane, DION, and AOC all position epoxy vinyl ester systems for aggressive chemical service, with specific grades validated for:
- Sodium hypochlorite (bleach) — a WEFTEC technical study on FRP sodium hypochlorite tanks tested brominated epoxy vinyl ester resin at 10% NaOCl at 120°F and reported flexural strength retention of up to 104% after 12 months
- Nitric acid, hydrogen peroxide, and high-concentration acids
- Concentrated sulfuric acid (concentration and temperature dependent)
One critical caveat: chemical compatibility is always resin grade, concentration, and temperature specific. Always confirm selections against the manufacturer's chemical resistance guide — a generic "vinyl ester is resistant" claim is not sufficient.
Vinyl Ester vs. Standard Polyester Linings
Older FRP tanks were often built with orthophthalic or isophthalic polyester resins. Vinyl ester's cross-linked molecular structure delivers measurable performance advantages over these systems:
- Lower permeability to water and aggressive chemicals
- Superior resistance to osmotic blistering in immersion service
- Significantly better performance in oxidizing environments such as bleach-plant service
Industry standards back these performance claims directly. The TAPPI TIP 0402-28 guidelines for inspecting FRP equipment explicitly state that epoxy vinyl ester resins provide superior chemical resistance compared to polyesters, particularly in oxidizing environments. A peer-reviewed study in Composites Part A confirmed lower seawater absorption and better hydrolytic stability for vinyl ester composites versus isophthalic polyester — the key mechanism driving blister prevention in immersion service.
Chemical resistance selections should be validated against ASTM C581, the standard practice for evaluating chemical resistance of thermosetting resins in glass-fiber-reinforced structures intended for liquid service.
Fiberglass Tank Vinyl Ester Lining Installation Guide
Vinyl ester lining installation on FRP follows a defined sequence: structural assessment, mechanical surface preparation, tack coat, multi-layer laminate build, full cure, and validation. Skipping or rushing any stage produces failure modes that cost far more to remediate than the time saved during installation.
Prerequisites and Safety Considerations
Before any lining work begins, three things need to be established:
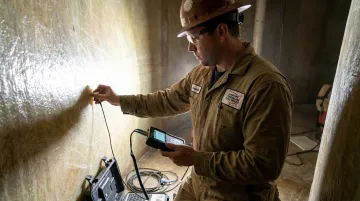
Structural integrity of the existing FRP tank wall. Check for delamination, cracks, or laminate degradation using ultrasonic testing or high-intensity backlight inspection. AFTR uses both methods to reveal not just surface conditions but internal laminate status — including capillary migration of liquid product beneath the corrosion coat.
Chemical history of the tank. Residual contaminants interfere with cure. Sodium hypochlorite, ferric chloride, and hydrochloric acid all leave residues that require neutralization and thorough cleaning before resin can be applied.
For tanks with unknown chemical history, a Fiberglass Tank & Pipe Institute (FTPI) certified inspector should assess the vessel before scoping any work. This defines repair scope accurately and prevents lining a structurally compromised tank.
Condition of any existing lining or gel coat. Determine whether it needs full removal or can serve as a substrate for the new lining.
Environmental non-negotiables:
- Ambient and substrate temperature must be at least 60°F (15°C)
- Substrate surface temperature must be at least 5°F (3°C) above the dew point
- AOC's Vipel F010 TDS specifies shop conditions of 65–90°F and 40–90% relative humidity for consistent results
- Adequate ventilation for styrene emissions — NIOSH lists a styrene REL of 50 ppm TWA; OSHA's PEL is 100 ppm TWA
- Confined space entry protocols per OSHA 29 CFR 1910.146 for work inside closed tanks
- Full PPE: respirator rated for styrene/organic vapors, chemical-resistant gloves, eye protection
Tools and Materials Required
Materials:
- Vinyl ester resin — formulation matched to the specific stored chemical service
- MEKP (methyl ethyl ketone peroxide) catalyst
- Promoters/accelerators as specified by the resin system
- Fiberglass reinforcement: surfacing veil (chemical contact face), chopped strand mat (structural build), woven roving where required
- Acetone for surface cleaning
- Calibrated mixing vessels and graduated measuring equipment
AFTR works with over 45 fiberglass mat, chopped strand, Nexus, Harlar, and carbon veil laminates — laminate schedule selection is driven by the specific chemical, concentration, and operating temperature for that tank.
Tools:
- Angle grinder with abrasive flap disc for surface preparation
- Laminating rollers (bubble rollers and aluminum serrated rollers)
- Mixing paddles and small-batch mixing vessels
- Brush, roller, or airless spray for primer coats
- Calibrated wet film thickness gauge
- Holiday detector (spark tester or wet sponge tester)
- Thermometer and hygrometer for environmental monitoring
Step-by-Step Installation
1. Surface preparation
Mechanically abrade the entire interior surface using a grinder or abrasive disc to remove gloss, any failed coating or gel coat, and surface contamination. The goal is a uniformly dull, clean FRP surface with mechanical tooth for bonding. This is not a blast profile like steel requires, but surface cleanliness and abrasion quality are equally critical to adhesion.
After grinding, wipe down with acetone and allow complete solvent flash-off before applying any resin. Applying resin over residual acetone is one of the leading causes of osmotic blistering.
2. Primer/tack coat
Apply a thin coat of catalyzed vinyl ester resin by brush, roller, or spray to fully wet out the prepared FRP surface. This coat establishes the chemical bond to the substrate.
The tack coat must be in a green/tacky state — not fully cured — when reinforcement layers go on. A simple field check: press a clean fingertip to the surface. If it pulls away with slight resistance but no transfer of wet resin, the timing is correct. If it's fully dry, the chemical bond window has closed and the surface needs re-evaluation.
3. Reinforcement and build coats
Apply fiberglass mat layers embedded in catalyzed vinyl ester resin. Use laminating rollers to eliminate all air bubbles and dry spots — entrapped air is a delamination waiting to happen.
Typical layer sequence:
- Surfacing veil for the chemical contact face
- Followed by chopped strand mat plies to build structural thickness
Additional considerations:
- Stagger overlap seams so they don't stack at the same location
- Give extra attention to corners, nozzle tie-ins, and penetrations — these are the highest stress concentration points and the most common failure locations
- Wet-out must be complete at every ply, particularly at the feathered edges where new material meets existing lining
4. Cure management
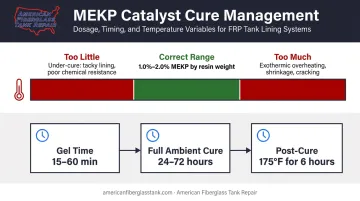
MEKP catalyst ratio is the single biggest process control variable. Per AOC's Vipel F010 technical data sheet, MEKP should be maintained at 1.0% to 2.0% by resin weight — always measured by weight, not estimated by volume.
- Too little catalyst: permanently tacky, under-cured lining with compromised chemical resistance
- Too much: exothermic overheating, shrinkage, internal stress, and potential cracking
At ambient temperature (approximately 77°F), expect a gel time of 15–60 minutes depending on the promoter package. Full ambient cure typically requires 24–72 hours. For aggressive service conditions — particularly oxidizing chemicals — post-cure at elevated temperature is required to achieve full chemical resistance. A typical post-cure schedule for Derakane 470-300 is 24 hours at room temperature followed by 6 hours at 175°F (80°C).
Post-Installation Checks and Validation
Visual inspection first. Check for dry spots, air entrapment, pinholes, uneven thickness, and delaminated edges at overlaps or nozzle tie-ins. These are failure points that must be repaired before the tank goes into service.
Holiday/spark testing. A wet sponge tester (low-voltage) or spark tester (high-voltage for thicker laminates) detects pinholes and discontinuities in the cured lining. One important caveat from TAPPI TIP 0402-28: spark testing is appropriate for new FRP laminate linings on conductive substrates, but is not recommended for used FRP linings because chemical permeation can increase conductivity and cause burn-through. Select the method and voltage based on lining thickness and substrate condition — consult ASTM D5162 and NACE SP0188 for voltage-by-thickness guidance.
Document everything. Record catalyst ratios, ambient and substrate temperatures during application, relative humidity, layer count, and all test results. This documentation is essential for warranty validation and provides the baseline reference for future inspections.
How to Repair Vinyl Ester Lining on a Fiberglass Tank
Repair vs. Reline Decision
Before any repair work starts, the extent and cause of lining damage must be fully documented. The decision framework:
- Spot repair: Localized pinholes, surface cracks, or small delaminated areas where the underlying FRP structure is confirmed sound
- Full relining assessment: Widespread delamination, osmotic blistering across large surface areas, or damage that has penetrated into the structural laminate of the tank wall
No universal numeric threshold (percentage of area affected, blister count per square foot) exists in publicly accessible industry standards for this decision. The defensible approach is inspection-driven: assess the corrosion barrier, structural wall condition, permeation extent, and service severity before committing to a repair scope.
AFTR's field inspection services use ultrasonic and high-intensity backlight testing to assess damage extent before repair scope is defined — preventing both costly over-repair and inadequate under-repair. In AFTR's field experience, relining consistently costs a fraction of full tank replacement, and properly executed FRP linings routinely remain in service for 20+ years.
Repair Process
Surface Preparation
Surface preparation is as critical for repairs as for new installation:
- Grind back all damaged lining material to sound substrate
- Feather (taper) the edges of the repair area at a low angle with a grinder — this creates a gradual transition for the new laminate to bond onto
- Abrade the FRP substrate beneath the repair area
- Neutralize and remove any chemical contamination from the stored product before applying resin
Laminate Application and Validation
Repair laminate follows the same sequence as the original installation. Key requirements:
- Extend each patch well beyond the damaged area margins to ensure adhesion to sound lining
- Achieve full wet-out at the feathered edges — this is where repair failures almost always initiate
- Holiday-test all repaired areas after cure before returning the tank to service
A repair that passes holiday testing but was applied over residual contamination or an inadequately abraded substrate will fail again within months. This is why surface prep sign-off — not just laminate application — should be treated as the critical hold point in any repair sequence.
Common Installation and Repair Problems and Fixes
Tacky or Under-Cured Lining Surface
Problem: The cured lining remains sticky or soft days after application.
Likely causes:
- MEKP catalyst ratio too low
- Ambient temperature too cold during cure
- Oxygen inhibition on the top coat (inherent to styrene-based resins — the surface stays tacky without a paraffin wax additive or surfacing agent in the finish coat)
Fix: Two distinct scenarios require different responses:
- Oxygen inhibition on the final coat: Apply a wax-containing topcoat or surface veil system
- Under-cure from catalyst or temperature errors: Grind back the affected material and re-apply under controlled conditions — adding more resin on top of an under-cured lining will not salvage it
Delamination at Overlaps or Nozzle Areas
Problem: The new lining lifts or separates from the substrate or previous ply at seams, corners, or around fittings.
Likely causes:
- Inadequate surface preparation at those specific locations (easy to miss corners during grinding)
- Air entrapment not fully rolled out during lamination
- Tack coat reaching full cure before reinforcement plies were applied
Fix: Grind back the delaminated area fully, feather the edges, and re-laminate with correct sequencing. Review application workflow to confirm reinforcement is applied while the tack coat is still in the green/tacky state.
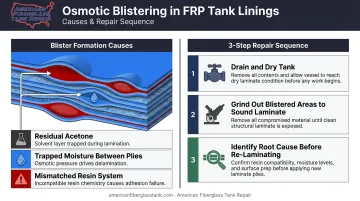
Osmotic Blistering
Problem: Dome-shaped blisters develop on the lining surface after the tank returns to service.
Likely causes:
- Residual acetone from surface cleaning that was not fully flashed off
- Moisture trapped between laminate plies during application
- Resin system not matched to immersion service
Fix: Drain the tank, allow it to dry thoroughly, and grind out all blistered areas back to sound laminate. Before re-laminating, identify the root cause — whether flash time, humidity controls, or resin selection — because repairing the surface without correcting the underlying condition will produce the same failure again.
Pro Tips for Vinyl Ester Lining Work on Fiberglass Tanks
Catalyst Discipline
Always weigh catalyst rather than estimating by volume. Small errors in MEKP ratio compound across a large surface area and produce inconsistent gel times. Mix small batches to maintain control and discard any material that has started to gel.
Environmental Monitoring
Measure and record ambient temperature, substrate temperature, and relative humidity at the start of each work period and periodically throughout the day. Stop work if:
- Substrate temperature is within 5°F of the dew point
- Relative humidity exceeds 85%
- Substrate temperature is below 60°F
Adding more catalyst cannot fix a lining applied in unsuitable conditions.
When to Bring in a Specialist
Certain situations are beyond field improvisation:
- Unknown chemical history in the tank
- Existing laminate showing signs of structural degradation (not just lining degradation)
- Tanks storing highly aggressive oxidizing chemicals like concentrated sodium hypochlorite
- Full relining of a large vessel requiring engineered material specifications and controlled application conditions
These scenarios require certified FRP laminators, resin selection tied to ASTM C581-validated data, and structured inspection and documentation practices that support a 15-year service life.
Conclusion
The quality of a vinyl ester lining on a fiberglass tank comes down to two things above all else: the thoroughness of surface preparation and the discipline of cure management. Both are areas where inexperienced applicators consistently cut corners — and the consequences rarely surface immediately. Blister fields can take six months to appear; delamination spreading through nozzle tie-ins may not show for two years.
Treat installation and repair as engineering work, not a maintenance task. Proper documentation, environmental controls, material selection, and post-installation testing are what determine whether a lining holds for 15–25 years or fails before the first service cycle ends. If you're working with a contractor, verify they follow each of these steps — and get it in writing before work begins.
If professional installation or repair is needed, American Fiberglass Tank Repair deploys field service teams across all 50 states, with engineer-driven processes and Fiberglass Tank & Pipe Institute certified inspectors on every project.
Frequently Asked Questions
Is vinyl ester resin fiberglass?
Vinyl ester is a resin system — the binding matrix — not fiberglass itself. Fiberglass refers to the glass fiber reinforcement. Together, vinyl ester resin and fiberglass reinforcement form a composite laminate (FRP). A "fiberglass tank" uses resin (often vinyl ester or polyester) to bind the glass fibers into a structural material.
How long does vinyl ester resin last?
A properly installed, glass-reinforced vinyl ester lining in appropriate chemical service typically achieves 15–25 years before major maintenance is required. Service life depends heavily on installation quality, surface preparation, and whether stored chemicals remain within the validated resistance range of the specific resin formulation.
Does vinyl ester resin prevent fiber blistering?
Vinyl ester's low permeability and superior moisture resistance make it far more resistant to osmotic blistering than standard polyester resins. It doesn't eliminate risk entirely — installation defects that trap moisture between plies can still cause problems — but a correctly applied vinyl ester system is the industry standard for blister-resistant tank linings.
What surface preparation is required for vinyl ester lining on a fiberglass tank?
FRP tanks require mechanical abrasion (grinding or sanding to remove gloss and contamination) rather than the abrasive blasting used on steel. The surface must be clean, dry, uniformly abraded, and free of solvent residue before resin application. Skip this step and the new lining will not achieve a reliable chemical bond.
Can a fiberglass tank be relined rather than replaced?
For structurally sound FRP tanks showing internal lining degradation, relining is the preferred approach over replacement. It costs considerably less, minimizes downtime, and a properly applied vinyl ester relining restores full corrosion protection while extending service life by many years.
What is the difference between vinyl ester and epoxy lining for fiberglass tanks?
Vinyl ester outperforms epoxy for tanks storing oxidizing chemicals (bleach, nitric acid, hydrogen peroxide) and bonds chemically to FRP substrates more effectively than most epoxy systems. Epoxy is preferred for hydrocarbon and solvent service and generally costs less. The correct choice depends on the stored chemical — always confirm against the resin manufacturer's chemical resistance guide.