The core problem: treating all stress cracks the same way. A hairline crack in the gelcoat and a fracture running through multiple laminate layers are fundamentally different problems requiring different responses. Applying a quick filler to either without understanding its depth or cause almost always leads to recurrence — or worse, a repair failure that accelerates the original damage.
This guide covers how to correctly classify FRP tank stress cracks, execute repairs step by step, know when professional intervention is the right call, and prevent cracks from developing in the first place.
Key Takeaways
- Stress cracks range from cosmetic gelcoat-only fractures to structural laminate failures — classification determines everything about the repair approach
- Root causes include mechanical overloading, thermal cycling, chemical degradation, and rigid plumbing connections at fittings
- Structural repairs require proper surface prep, a chemically compatible resin system, and a multi-layer fiberglass laminate buildup
- Cosmetic cracks on non-chemical-service tanks can often be handled in-house; cracks that penetrate the laminate or sit near fittings need a professional assessment
- Post-repair validation testing is non-negotiable — skipping it is routinely the most expensive mistake owners make
What Are Stress Cracks in Fiberglass Tanks?
Stress cracks are fractures in the fiberglass laminate or gelcoat that develop when localized forces — mechanical, thermal, or chemical — exceed the material's strain tolerance. They're distinct from impact damage or manufacturing defects, which have separate root causes and different repair implications.
The Two Categories That Matter
Cosmetic cracks are confined to the outer gelcoat layer. They don't threaten structural integrity, but they're not harmless either — moisture can penetrate and cause delamination or osmotic blistering over time if left unaddressed.
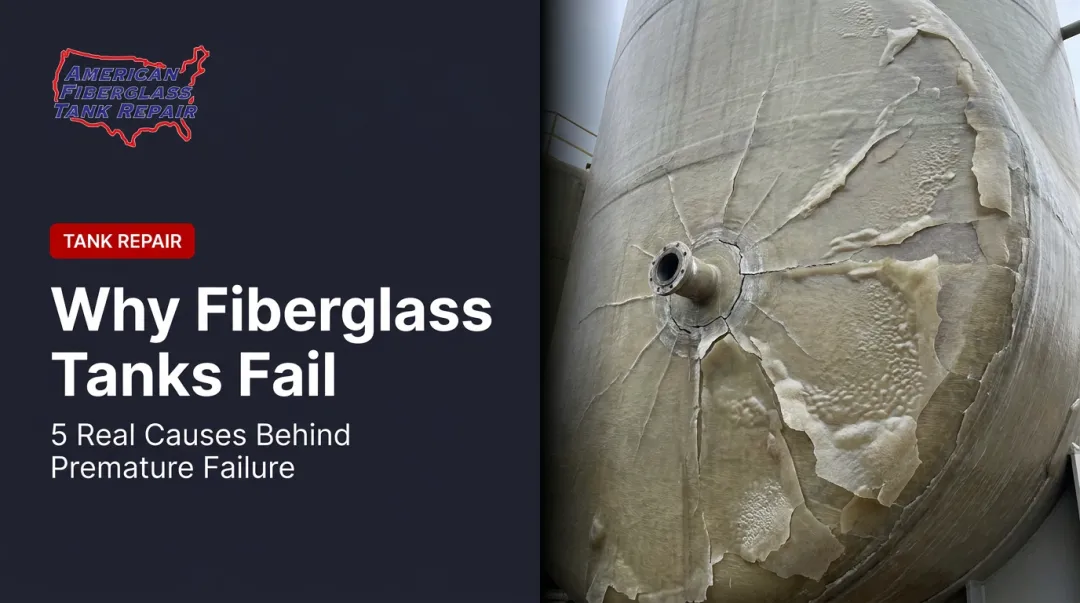
Structural cracks penetrate one or more laminate layers. These create active leak and integrity risks, particularly in tanks storing chemicals, potable water, or regulated substances. For tanks in chemical service — sodium hypochlorite, ferric chloride, HCl, or sodium hydroxide — a structural crack also creates a direct contamination pathway.
The critical point: visual inspection alone cannot reliably determine crack depth. What looks like a surface crack may have already compromised the laminate beneath. AFTR's inspection teams use ultrasonic, laser, and high-intensity backlight testing because surface appearance routinely understates the depth of damage below.
Common Crack Patterns and What They Signal
| Pattern | Typical Appearance | Common Cause |
|---|---|---|
| Hairline cracks | Fine, single-line fractures | Localized mechanical stress or thermal cycling |
| Spider/crazing | Radiating pattern from a focal point | Point loading or impact stress concentration |
| Linear seam cracks | Straight fractures along joints or fittings | Rigid plumbing loads, thermal movement, or poor installation |
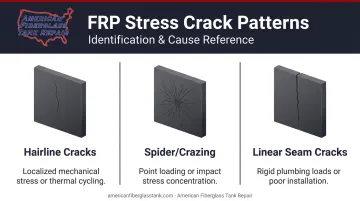
One pattern worth flagging: spider cracks radiating from a fitting or penetration almost always indicate ongoing mechanical stress at that location. Repairing the crack without addressing the root cause — rigid plumbing loads, thermal movement, improper support — will produce recurring failures.
Why Do Fiberglass Tanks Develop Stress Cracks?
Understanding the cause is non-negotiable before attempting any repair. Fix the crack without fixing the cause and it will return.
Mechanical Stress
Point loads, uneven foundation support, ground settling, and vibration from connected equipment all create concentrated stress in the laminate. Fittings and nozzle penetrations are particularly vulnerable: rigid piping connections transfer external loads directly into the tank wall, acting as fulcrums that concentrate stress at the penetration perimeter.
NOV's fiberglass tank installation instructions specifically require flexible piping connections at all tank nozzles, noting that improper installation can lead to tank failure and environmental contamination. Rigid plumbing directly into tank fittings is a documented crack initiation mechanism.
Thermal Cycling
Outdoor tanks and those in temperature-extreme environments experience repeated expansion and contraction. Over time, this fatigues the resin matrix, particularly in areas where thermal movement is constrained. Gelcoat cracking around fitting penetrations and at the tank base are classic thermal cycling signatures.
Chemical Degradation
Chemical and wastewater tanks face a compounding threat. Research published in the Journal of Hazardous Materials found that environmental stress-corrosion cracking occurs when FRP is exposed to both mechanical stress and a corrosive chemical environment simultaneously — and that tanks can fail below design load once the corrosion-resistant barrier breaks down.
Each of the most common aggressive chemicals in industrial service — sodium hypochlorite, HCl, ferric chloride, sodium hydroxide — has specific resin compatibility requirements. A 2017 study on FRP tanks in HCl service estimated service life for tanks storing 35% hydrochloric acid at under 20 years.
What Happens When Cracks Go Unaddressed
- Moisture ingress leads to delamination and osmotic blistering
- Chemical migration beneath the corrosion coat weakens the structural laminate
- Small cracks propagate under continued mechanical or thermal loading
- In regulated applications, undetected cracks create compliance exposure
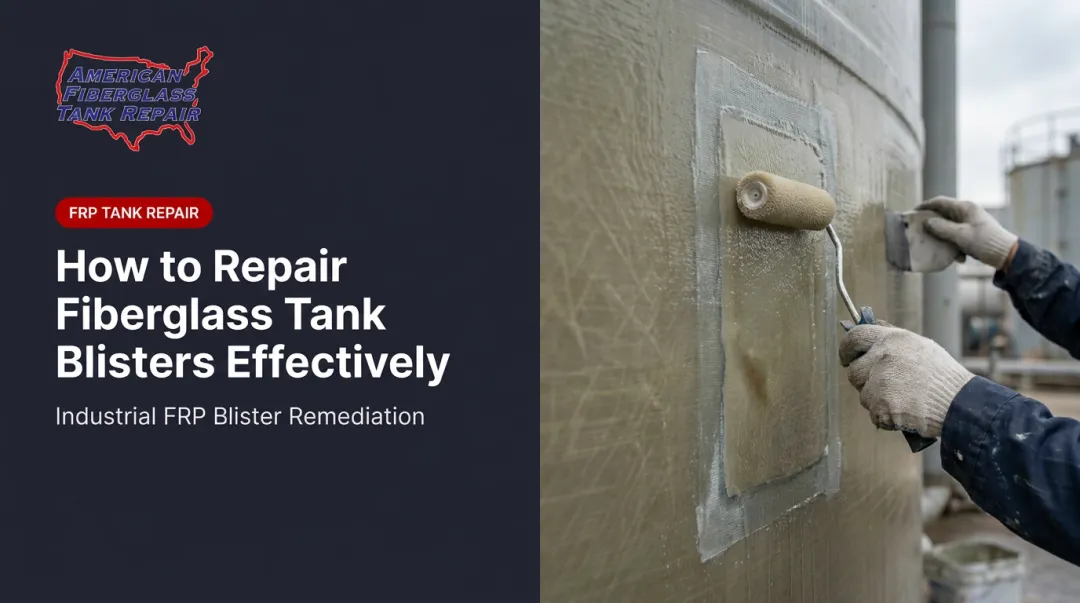
How to Repair Fiberglass Tank Stress Cracks: Step-by-Step
Step 1: Inspect and Classify the Crack
Before touching any tools, map the full crack path under strong lighting. Use a marker to trace its extent, including any branching. Note its location relative to seams, fittings, and the tank base — location tells you a great deal about likely cause.
Assess depth using:
- A fine pick tool to probe for laminate flexibility or movement
- Visual check for moisture staining, soft surrounding areas, or seepage
- For industrial tanks: ultrasonic testing and high-intensity backlight inspection to definitively determine whether the crack is gelcoat-only or has penetrated the structural layers
AFTR's FTPI-certified inspectors use ultrasonic, laser, and high-intensity backlight methods to detect not just surface conditions, but what's occurring inside the structural body — including capillary migration of liquid product beneath the corrosion coat. For any tank storing chemicals or regulated substances, this level of assessment is worth the cost.
Output of Step 1: A clear classification — cosmetic (gelcoat repair) or structural (laminate rebuild) — and an understanding of the root cause that must be corrected.
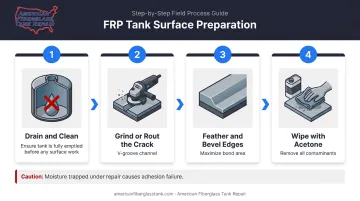
Step 2: Prepare the Surface
Surface preparation is where most failed repairs begin — and where shortcuts cause the most damage down the line.
- Drain and clean the tank completely — the repair area must be bone dry. Moisture trapped under a repair causes adhesion failure and delamination.
- Grind or rout the crack open using an angle grinder or rotary tool to create a clean V-groove or channel. Never attempt to fill a hairline crack without opening it — filler won't bond and will re-crack.
- Feather the repair zone edges at a wide bevel to maximize bonding surface area. General FRP repair guidance from Composites UK recommends scarf repairs use significant taper ratios for structural work — the wider the bevel, the more bond area available.
- Wipe thoroughly with acetone to remove all dust, oils, and surface contamination before applying repair materials.
Step 3: Select the Right Repair System
Resin selection is not a generic decision. Using the wrong resin for the service environment will fail faster than the original damage.
Cosmetic (gelcoat-only) cracks call for a color-matched isophthalic or standard polyester gelcoat paste. Apply with a putty knife, overfill slightly, and cover with polyester film during cure — gelcoat won't fully cure when exposed to air. Sand flush once cured.
Structural laminate cracks require a resin matched to the service environment:
| Resin Type | When to Use |
|---|---|
| Isophthalic polyester | General water service, mild chemical environments |
| Vinylester | Chemical exposure, higher-performance requirements, most wastewater applications |
| Epoxy | Maximum chemical resistance; must match existing laminate chemistry |
For chemical service tanks — particularly those storing sodium hypochlorite, HCl, ferric chloride, or sodium hydroxide — resin selection must align with the chemical-specific guidance from ACMA/INEOS, which specifies premium epoxy vinylester for hypochlorite service and Bis-A epoxy vinylester for ferric chloride and aluminum sulfate up to 212°F.
AFTR's repair teams work with custom-blended isophthalic and terephthalic polyester, vinylester, and epoxy resins, along with over 45 mat and veil options — enabling them to match original laminate construction precisely rather than approximating it. That precision in selection directly shapes how the repair is applied.
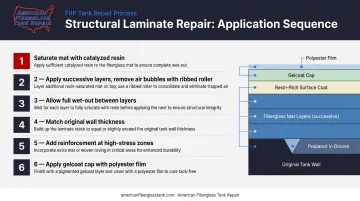
Step 4: Apply the Structural Repair
- Saturate fiberglass mat or woven roving with catalyzed resin
- Apply in successive layers into the prepared groove, working out air bubbles with a ribbed roller after each layer
- Allow each layer to fully wet out before adding the next
- Build laminate thickness to at least match original wall thickness at the repair zone
- At high-stress locations (near fittings, seams, or the knuckle radius), add reinforcement layers extending well beyond the crack boundary; finish with a resin-rich surface coat or gelcoat cap covered with polyester film for full cure
Step 5: Test and Validate the Repair
Full cure time per the resin manufacturer's specifications is not optional. Returning a tank to service early is one of the most common causes of repair failure.
Validation steps:
- Conduct a hydrostatic leak test or fill-and-hold test before reintroducing stored product
- For chemical or regulated-service tanks, perform post-repair ultrasonic thickness measurement to verify laminate integrity
- Document the repair — materials used, resin system, laminate layers, test results — for compliance records and future maintenance reference
AFTR's inspections generate detailed reports covering surface and structural conditions and repair recommendations. That same documentation standard matters for any repair: thorough records support regulatory compliance, help identify recurring failure patterns, and protect you if a tank's service history is ever questioned during an audit or incident review.
Repair vs. Replace: When Each Is the Right Call
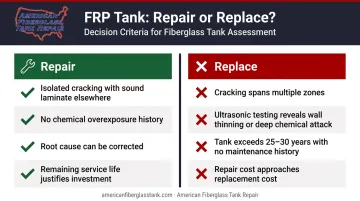
The decision hinges on crack severity, laminate condition, chemical service history, tank age, and cost comparison.
Repair makes sense when:
- Cracking is isolated to one or two zones with sound laminate elsewhere
- The tank has no history of chemical overexposure or delamination
- The root cause (rigid plumbing, poor foundation support) can be corrected as part of the repair
- Remaining service life justifies the repair investment
Replacement makes sense when:
- Crazing or cracking spans multiple zones, indicating global laminate degradation
- Ultrasonic testing reveals wall thinning or deep chemical attack beyond acceptable limits
- The tank has exceeded 25–30 years with no maintenance history and significant accumulated damage
- Repair cost approaches replacement cost without meaningful life extension
Based on field experience since 2003, AFTR's position is that even when a tank has breached its corrosion barrier, the structural laminate is often still sound. Relining and structural repair remain viable in more cases than a visual inspection alone would suggest.
Engineer-driven inspection reports — using ultrasonic and high-intensity backlight testing — provide the objective data needed to make this call with confidence rather than guesswork.
For chemical service tanks, repair with the right resin, proper laminate buildup, and root cause corrected costs a fraction of new-tank capital. It also avoids the procurement lead times that new FRP vessel orders involve, which can stretch weeks or months depending on the vessel specification.
Common Mistakes to Avoid
Filling a crack without correcting the underlying cause — rigid plumbing, a foundation problem, or chemical incompatibility — guarantees recurrence. The structural issue is part of the repair scope, not a follow-up task.
Material mismatches cause early failure. Applying polyester over an epoxy laminate, selecting a resin with inadequate chemical resistance, or using consumer-grade products not rated for industrial tanks can all result in bond failure within months of repair.
Poor surface prep is the leading cause of patch failure. Inadequate grinding, residual moisture, and incomplete solvent cleaning all produce delamination — contaminated laminates must be fully dried and wiped before any repair laminate is applied.
Returning a tank to service without a hydrostatic test and laminate verification leaves failure points undetected. In chemical storage or regulated water systems, that gap also creates direct compliance exposure.
How to Prevent Stress Cracks in Fiberglass Tanks
Three practices eliminate the majority of stress crack risk:
1. Annual inspections — before problems compound Annual visual and ultrasonic inspection is the accepted industry benchmark for industrial FRP tanks. AFTR's preventive programs apply ultrasonic, laser, and high-intensity backlight testing to catch microcracking, delamination, and liner degradation before they become structural failures — keeping repairs manageable and service life long.
2. Proper installation and support Tanks must sit on flat, level foundations with uniform support. All piping connections require flexible couplings or expansion joints — rigid plumbing run directly into tank fittings transfers external loads into the wall and is a well-documented cause of fitting-area cracking (per NOV installation guidelines).
3. Chemical compatibility monitoring Stored chemicals must stay within the tank's original design resistance profile. If the chemical, concentration, or operating temperature changes from that design basis, re-evaluate the laminate for compatibility before continuing service. ASTM C581 is the standard practice for assessing resin chemical resistance.
Frequently Asked Questions
Can you repair a fiberglass tank stress crack yourself?
Cosmetic gelcoat-only cracks in non-chemical-service tanks can be addressed by experienced maintenance staff with the right materials and proper surface preparation. Any crack penetrating the structural laminate — or in a tank storing chemicals, potable water, or regulated substances — requires a certified FRP professional. Material compatibility and laminate integrity are too consequential to approximate.
What is the best resin to use for fiberglass tank stress crack repair?
Resin selection depends on the tank's original construction and chemical service:
- Isophthalic polyester — general water or mild chemical service
- Vinylester — most industrial chemical environments
- Epoxy — highest chemical resistance; must be matched carefully to the existing laminate
The wrong resin choice typically fails faster than the original crack.
How do you tell if a stress crack is structural or just cosmetic?
Cosmetic cracks stay in the gelcoat, show no laminate flexibility, and have no moisture ingress. Structural cracks penetrate the laminate layers and may show slight movement under pressure, seepage, or soft areas in the surrounding laminate. When visual methods are inconclusive — which is common — ultrasonic and high-intensity backlight testing provide definitive depth assessment.
How long does a fiberglass tank stress crack repair last?
A properly executed repair (correct resin system, full surface prep, adequate laminate buildup, and root cause correction) can last the tank's remaining service life. Repairs that skip prep, use incompatible materials, or ignore the root cause typically fail within months and often require full remediation.
When should a stress-cracked fiberglass tank be replaced rather than repaired?
Replacement makes sense when cracking spans multiple zones, the laminate shows significant wall thinning or global chemical degradation, or the tank has exceeded its design service life. A professional FRP inspection using ultrasonic and backlight testing (not a visual walk-around) is the most reliable basis for that call.