The mechanism is straightforward: moisture infiltrates the tank laminate through osmotic pressure, combines with water-soluble residues inside the laminate, and pushes the surface outward into a pressurized dome. The longer it goes undetected, the deeper the damage reaches.
This guide covers what fiberglass tank blisters are, how to classify severity, a practical step-by-step repair process, when repair makes sense versus replacement, and how to prevent recurrence.
Key Takeaways
- FRP tank blisters are dome-shaped defects caused by osmotic pressure as water penetrates the laminate and reacts with water-soluble residues
- Severity ranges from near-surface Type I blisters to deep, systemic Type III delamination
- Effective repair follows a strict sequence: open and drain each blister, dry the substrate completely, grind back to sound laminate, rebuild layers, and seal with a protective barrier coat
- Applying new laminate over wet substrate is the single most common cause of repair failure
- Deep or widespread blistering warrants assessment by a certified FRP inspector before repairs begin
What Are Fiberglass Tank Blisters?
Fiberglass tank blisters are raised, dome-shaped formations on the interior or exterior surface of an FRP tank wall. They form when water molecules penetrate the laminate and combine with water-soluble substances — residual chemicals, fabrication contaminants, resin byproducts — to create a pressurized acidic solution beneath the surface.
The FRP laminate acts as a semi-permeable membrane. The concentrated solution inside draws in more water through osmotic pressure, builds pressure, and pushes the laminate surface outward into that dome shape.
In industrial tanks, that pressure buildup is a structural problem. Unlike minor gelcoat blistering in marine applications, FRP tank blisters can compromise the corrosion liner — the layer that protects the structural wall from whatever the tank is storing. Once that liner is breached, aggressive stored media can begin attacking the structural laminate directly:
- Sodium hypochlorite (bleach/disinfection tanks)
- Ferric chloride (chemical treatment systems)
- Hydrochloric acid (industrial process tanks)
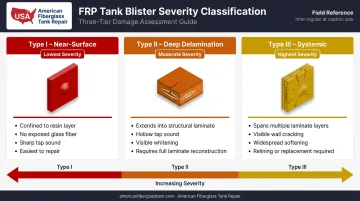
Types of Fiberglass Tank Blisters: How Severe Is the Damage?
Not all blisters are equal. Severity determines whether simple patching, full liner restoration, or tank replacement is required. Misclassifying severity is a leading cause of failed repairs.
Type I: Near-Surface Blisters
Type I blisters are confined to the resin-rich surface layer or inner liner. They haven't yet penetrated structural laminate. Symptoms include:
- Small raised domes, often fluid-filled
- No exposed glass fiber when opened
- Solid, consistent sound when tapped
These are the most common finding during routine inspections and the easiest to address. Caught at this stage, repair is straightforward and localized.
Type II: Deep Blisters and Delamination
Type II blisters extend through the surface layer into the structural laminate. Key indicators:
- Hollow sound when tapped (versus a sharp ring from sound laminate)
- Visible whitening, cracking, or layer separation
- Soft or spongy feel under pressure
Type II damage requires full laminate reconstruction in the affected zone — not just surface patching. The tap test is a reliable screening tool here: sound laminate produces a sharp ring, delaminated areas produce a dull, hollow thud.
Type III: Severe, Systemic Blistering
Type III blistering is widespread across significant surface area. At this stage, the liner or structural wall is systemically compromised. Signs include:
- Deep delamination spanning multiple laminate layers
- Visible cracking across the structural wall
- Widespread softening or collapse of wall sections
Full relining or tank replacement is typically required. Patching individual blisters without addressing the root cause won't hold.
For accurate depth measurement beyond what a tap test can confirm, ultrasonic thickness testing by certified inspectors — such as those holding FTPI credentials — provides quantitative depth mapping that tap testing cannot. SPIE research on phased-array ultrasonic NDT validated ultrasonic C-scan on FRP tanks aged 10–30 years, confirming it as a reliable approach where tap testing alone falls short.
Why FRP Tanks Develop Blisters: Root Causes
Manufacturing and Material Factors
Several conditions created during fabrication set the stage for osmotic blistering:
- Water-soluble catalysts and uncured resin byproducts left in the laminate
- Entrapped air voids and fabrication contamination
- Use of orthophthalic polyester resins, which absorb more moisture than isophthalic or vinylester alternatives
- Inadequate corrosion liner thickness or improper layup sequence
Per Ashland's chemical resistance guidance for epoxy vinyl ester FRP applications, resin selection must be evaluated against the specific chemical, concentration, and operating temperature — a generic resin ranking doesn't hold across all service conditions.
Operational and Environmental Triggers
Once a tank is in service, several factors accelerate blistering:
- Prolonged exposure to aggressive stored media (acids, caustics, solvents)
- Thermal cycling that stresses laminate interfaces
- Physical impact or abrasion that breaches the corrosion liner
- Elevated operating temperatures, which accelerate moisture absorption — a rate confirmed by moisture diffusion research on FRP structures
The Maintenance Gap
These triggers rarely announce themselves. Blistering worsens silently, and tanks without a scheduled inspection program frequently reach Type II or III severity before anything is visible from the outside.
Early detection during an annual inspection can mean the difference between a localized patch job and a full relining project.
AFTR's inspection philosophy captures this plainly: "the best surprise is no surprise at all." Their field teams employ ultrasonic, laser, and high-intensity backlight testing to detect capillary migration of liquid product beneath the corrosion coat — damage that's invisible on the surface but actively progressing underneath.
How to Repair Fiberglass Tank Blisters: Step by Step
Attempting blister repair without first confirming severity and substrate dryness almost always leads to repeat failures. Trapped moisture beneath new laminate is the leading cause of ineffective blister repair.
Step 1: Inspect and Classify All Blisters Before Touching Them
Map and classify every blister across the tank surface before repair begins. Don't open anything until you know what you're dealing with.
- Use a tap test for preliminary classification across the entire affected area
- For industrial tanks storing chemicals or handling potable water, commission ultrasonic thickness testing to confirm laminate soundness beneath each blister field
- Document blister locations, size, and density to determine the full repair scope
AFTR's pre-repair assessments combine ultrasonic, laser, and high-intensity backlight testing, supervised by Fiberglass Tank & Pipe Institute certified inspectors. Clients receive detailed reports covering surface and structural conditions with specific repair recommendations before any work begins.
Step 2: Open, Drain, and Prepare Each Blister
Score blisters with a utility knife or grind them open with a disc grinder. Before you start:
⚠️ Safety note: Blisters in chemical tanks may contain highly acidic or caustic fluid under significant pressure. Mandatory PPE includes chemical-resistant gloves, eye protection, and respiratory protection appropriate for the stored media.
Drain each blister completely, then flush with clean water. Don't rush this step — residual fluid left in the cavity will contaminate the repair substrate.
Step 3: Dry the Laminate Thoroughly — This Step Cannot Be Rushed
The tank surface must reach adequate dryness for proper resin adhesion before any fill material is applied.
- Minor blisters: minimum 48 hours of drying under controlled conditions
- Deeper damage in a saturated wall: potentially several weeks, depending on wall thickness, ambient temperature, and humidity
- Verify with a moisture meter before proceeding — don't rely on elapsed time alone
Temperature and humidity both affect drying rate significantly. New laminate applied over wet substrate will fail — most blister recurrences trace back to cutting this step short.
Step 4: Grind to Sound Laminate and Clean
Each blister depression must be ground out until only solid, intact laminate remains:
- Remove all damaged, delaminated, and discolored material
- Tap-test the perimeter to confirm no hidden delamination extends beyond the grind boundary
- Clean thoroughly with acetone or an appropriate solvent to remove all contaminants before laminate application
A wide grind profile relative to the depth of damage maximizes the secondary bond area for the repair laminate. Your project engineer should confirm the appropriate taper geometry for your tank's construction standard and service conditions.
Step 5: Rebuild the Laminate and Apply Barrier Protection
The rebuilding sequence:
- Apply unthickened compatible resin as a wet-out coat — vinylester or epoxy for most chemical service tanks; never apply polyester over an epoxy substrate
- Layer fiberglass cloth, working from largest to smallest diameter to maximize secondary bond area
- Build back to original wall thickness with the appropriate number of laminate plies
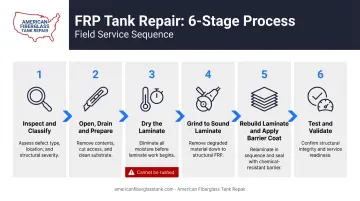
Resin selection directly determines whether the repair holds. Isophthalic polyester, vinylester, and epoxy carry different chemical resistance profiles — the repair resin must be compatible with both the stored media and the existing laminate.
AFTR works with custom-blended isophthalic and terephthalic polyester, vinylester, and epoxy resins matched to each tank's specific chemical, concentration, and operating temperature, along with over 45 fiberglass mat and veil laminate types.
Finish with a compatible protective barrier coat. Allow full cure before returning the tank to service.
Step 6: Test and Validate Before Returning to Service
Don't skip post-repair validation:
- Re-test all repaired areas with a tap test
- Use ultrasonic thickness gauging where applicable to confirm rebuilt laminate meets original thickness specification
- For tanks holding regulated contents (potable water, food-grade chemicals), a certified inspector must sign off before the tank returns to service
- Flag repaired zones for monitoring at the next scheduled inspection cycle
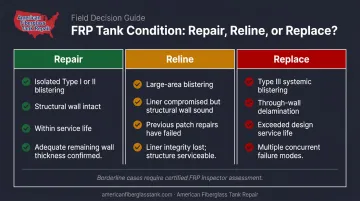
When to Repair vs. Replace Your Fiberglass Tank
The repair-versus-replace decision comes down to three factors: the proportion of the tank wall affected, the depth of delamination relative to wall thickness, and the cost-to-value ratio of the remaining service life.
Repair Makes Sense When:
- Blistering is isolated — Type I or Type II covering a limited surface area
- The structural wall laminate is intact and the corrosion liner can be rebuilt
- The tank is within its expected service life with no signs of systemic resin degradation
- Ultrasonic testing confirms adequate remaining wall thickness
Reline or Replace When:
- Type III blistering covers large surface areas
- Through-wall delamination or loss of laminate thickness beyond acceptable tolerance
- The tank has exceeded its design service life and shows multiple concurrent failure modes
- Patching individual blisters without addressing root cause has already failed once
Full relining frequently extends a tank's service life by many years at a fraction of new-tank cost — and without the procurement lead times that come with replacement. For assets on the borderline, an on-site condition assessment from AFTR's Field Service Engineers can clarify whether repair, relining, or replacement makes the most sense given the tank's condition, stored media, and your budget.
Preventing Fiberglass Tank Blisters From Returning
Establish a Scheduled Inspection Program
The most effective long-term prevention is catching blisters at Type I, not Type III. Per FTPI RP 2007-1, recommended external trained inspection intervals for aboveground atmospheric FRP tanks include:
- Every 5 years for hazardous-substance service
- Every 10 years for tanks over 10,000 gallons in other services
- After relocation or change to a dissimilar stored material
Monthly and annual visual PM inspections are also described in FTPI guidance, with comprehensive certified integrity inspections on a longer cycle.
A proper inspection covers visual survey, tap test, and ultrasonic thickness measurement — not just a visual walkdown.
Operational Best Practices
- Never operate tanks above their design temperature or pressure
- Avoid storing media more aggressive than what the liner resin is rated for
- Repair any physical damage to the corrosion liner immediately — scratches and gouges accelerate moisture ingress
- Maintain records of moisture readings over time to detect trends before they become failures
Barrier Coat Renewal for Mid-Life Tanks
When operational controls alone aren't enough, a compatible topcoat over an otherwise sound liner can add years to liner service life. Two factors drive that decision:
- Resin compatibility — the barrier coat must match both the stored media and the existing laminate chemistry
- Service envelope fit — some systems can adapt tanks to chemicals or temperature conditions beyond their original design parameters
AFTR's corrosion layer systems are engineered to address both, including situations where a tank's original spec no longer fits current operational demands.
Frequently Asked Questions
What do fiberglass tank blisters look like?
Blisters appear as rounded, raised domes on the tank surface — ranging from pencil-eraser size to several inches across — and often contain a yellowish or milky fluid under pressure. In industrial tanks, they're most commonly found on the interior corrosion liner surface.
What causes blisters in FRP storage tanks?
Blisters form through osmosis: water-soluble residues in the laminate draw moisture through the FRP wall, creating a pressurized acidic solution that pushes the surface layer outward. Manufacturing impurities, aggressive stored media, thermal cycling, and high-moisture-absorption resins all accelerate this process.
How do you know if fiberglass tank blisters are serious?
Small, isolated near-surface blisters are generally manageable. Blisters that sound hollow when tapped, cover large surface areas, or show visible cracking or delamination signal structural laminate damage and require immediate professional assessment.
Can fiberglass tank blisters be repaired without taking the tank out of service?
No. The tank must be fully emptied, cleaned, and taken out of service before repairs begin. Applying new resin over a laminate with residual moisture will cause repair failure and rapid re-blistering.
How long does fiberglass tank blister repair take?
Minor Type I patching may be completed in a day or two. Deeper Type II repairs that require drying time and full laminate rebuilding can take one to several weeks. Extensive projects such as full liner restoration may require a scheduled multi-week outage.
Is it better to repair or replace a fiberglass tank with widespread blistering?
Widespread blistering doesn't automatically mean replacement. Full relining is often a cost-effective alternative that restores a tank to service for many additional years. The decision should be made by a certified FRP inspector based on remaining wall thickness, delamination depth, and the tank's remaining service life.