The good news is that cosmetic spider cracks are genuinely repairable with basic tools and the right technique. The critical skill is knowing which cracks qualify as cosmetic — and which ones are telling you something more serious is wrong underneath.
This guide covers what spider cracks are, what causes them, how to repair them correctly, and when a DIY approach will make the problem worse rather than better.
Key Takeaways
- Spider cracks are surface fractures in the gelcoat caused by impact, thermal cycling, structural flex, or overly thick application
- Cosmetic spider cracks can be repaired by V-grooving, filling with matched gelcoat paste, sanding progressively, and polishing
- Repair sequence: assess laminate → clean → V-groove → fill → sand → polish
- Widespread cracking, soft spots, or any cracking on chemical or potable water FRP tanks requires professional inspection before repair
What Are Spider Cracks in Fiberglass Gelcoat?
Gelcoat is the hard, pigmented outer skin applied to fiberglass structures during manufacturing — typically at 15 to 35 mils thickness, according to the American Composites Manufacturers Association. It protects the structural laminate beneath from UV exposure, water intrusion, and surface abrasion.
The problem is that gelcoat is relatively rigid and brittle. When the fiberglass laminate beneath it flexes or absorbs localized stress, the gelcoat can't move with it equally — and micro-fractures develop at the surface. Those fractures are what most people call spider cracks.
Not all spider cracks carry the same risk, which makes classification the first step before any repair.
Cosmetic vs. Structural: The Distinction That Matters
Before any repair decision, you need to know which type you're dealing with:
| Type | Characteristics | Repair Approach |
|---|---|---|
| Cosmetic | Surface-only, stable, laminate feels solid | DIY gelcoat repair |
| Structural | Penetrates laminate, soft/spongy areas nearby, associated with hardware movement | Professional assessment first |
The simplest field test: press firmly on the gelcoat around the cracks. If it feels rock solid, the damage is surface-only. If it flexes, feels hollow, or has any softness, stop. A surface repair won't address a laminate issue beneath it.
Common Causes of Gelcoat Spider Cracks
Repairing the surface without fixing the root problem guarantees the cracks return. These four causes are responsible for the vast majority of gelcoat spider crack patterns:
- Impact stress — A concentrated point impact transfers energy through the gelcoat faster than it can absorb, producing the characteristic starburst or web pattern radiating from the strike zone. Dropped tools, rigging contact, and point loading during transport are common triggers.
- Thermal cycling — Gelcoat and the FRP laminate beneath it expand and contract at different rates as temperatures shift. Discover Composites notes that gelcoat should resist thermal cracking from dramatic temperature swings, but repeated cycles accumulate micro-stress that eventually fractures the surface. Dark-colored surfaces and tanks near industrial heat sources see this most aggressively.
- Structural flex around hardware — Flanges, fittings, and brackets concentrate mechanical loading into small areas. If the underlying laminate is under-reinforced or hardware has worked loose, the gelcoat at those stress points cracks repeatedly and will keep cracking until the structural issue is resolved.
- Over-thick gelcoat application — Ashland's gelcoat application guide recommends a total wet thickness of 18 to 24 mils applied in multiple passes, with no single pass exceeding 12 mils wet. Gelcoat applied too thick creates differential stress zones that crack over time, even without any external loading.

How to Repair Fiberglass Spider Cracks in Gelcoat: Step-by-Step
Before starting, confirm the cracks are cosmetic using the press test described above. If the surrounding material is solid and rigid, proceed.
Step 1: Clean and Prep the Surface
Wipe down the entire repair area with acetone on a lint-free cloth. Remove all wax, grease, mold release, and surface contamination — any residue will prevent the new gelcoat from bonding chemically with the existing surface. Let the area dry completely.
Step 2: Open the Cracks (V-Grooving)
Skipping this step is the most common reason DIY gelcoat repairs fail within months.
Using a rotary tool (a Dremel with a small conical grinding bit works well), carefully trace each crack at moderate speed to grind a shallow V-shaped channel. The V-groove gives the filler more surface area to bond against mechanically. Applying gelcoat paste directly over a sealed crack — without opening it first — causes the repair to delaminate.
After grinding:
- Vacuum out all dust from the grooves
- Wipe clean with fresh acetone
- Allow to dry before filling
Step 3: Mix and Apply Gelcoat Paste
Use gelcoat paste, not liquid gelcoat resin. Paste-grade gelcoat has the right consistency for filling grooves, resists shrinkage better, and bonds chemically with the existing gelcoat surface.
Getting the color right takes a two-step approach. For newer builds, contact the original manufacturer with your structure's identifying information. For aged or faded surfaces, Jamestown Distributors advises making a test sample, fully curing it, then wet sanding and buffing before judging the final tone — never match color directly on the project.
Application process:
- Mix small batches with catalyst per manufacturer instructions
- Press paste firmly into V-grooves with a plastic putty knife, eliminating air pockets
- Slightly overfill each groove to allow for sanding
- Cover repairs with plastic film to exclude air during cure — TotalBoat notes that gelcoat won't cure to a glossy surface without an air barrier
- Allow full cure time per product specifications before sanding
Step 4: Sand Through Progressive Grits
Once fully cured, remove the plastic film and begin sanding:
- 80-grit dry with a hard sanding block — level the excess filler
- 220-grit wet — begin wet sanding
- 400-grit wet — refine the surface further
- 600-grit wet — final smoothing before polish
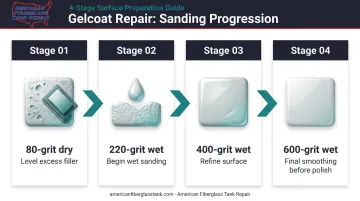
Always use a sanding block. Sanding freehand creates low spots that will be visible once the surface is polished. The surface will look hazy after wet sanding — that's normal.
Step 5: Polish and Protect
Apply a marine or industrial-grade rubbing compound and buff to restore gloss, then follow with wax or a compatible protective topcoat over the repair and surrounding area. For industrial FRP tanks, verify the topcoat is chemically compatible with whatever the vessel stores before applying.
When to DIY vs. Call a Professional
Not every spider crack warrants a DIY repair. The right call depends on what the structure contains, how widespread the damage is, and what's happening in the laminate beneath.
Repair it yourself when:
- Cracks are isolated and the surrounding laminate is solid
- The structure is recreational or decorative (non-critical service)
- Color matching is achievable
- The crack pattern is consistent with a single impact event
Call a professional when:
- Cracking is widespread across large sections
- Material around the cracks feels soft, spongy, or hollow
- Cracks radiate from hardware that moves or has failed
- Previous repairs haven't held
A Different Standard for Industrial FRP Tanks
For tanks in chemical, potable water, wastewater, or food processing service, the evaluation goes well beyond surface appearance. Spider cracks on these vessels may indicate corrosion barrier degradation, osmotic pressure, or chemical attack on the structural laminate — conditions that a gelcoat repair won't resolve and may actually mask.
Research into FRP corrosion barriers shows that micro-cracks can allow process fluids to penetrate deeper into the laminate; once the corrosion barrier is breached, stored chemicals can cause stress-corrosion cracking of structural glass fibers and eventually lead to loss of containment.
Our certified inspectors use ultrasonic, laser, and high-intensity backlight testing methods to assess conditions inside the structural laminate — including capillary migration of liquid product under the corrosion coat — before any repair recommendation is made.
Our inspection protocol examines the tank as a complete system, not just surface appearance:
- Spidering and disbondment
- Abrasion wear and emulsification
- Barcol hardness measurements
- Floor stress cracking and shell distortion
If your FRP tank stores aggressive chemicals like sodium hypochlorite, hydrochloric acid, ferric chloride, or sodium hydroxide, a professional inspection before any repair is not optional. A surface repair applied without understanding the underlying condition often fails within months — and can obscure damage that continues to progress.
How to Prevent Spider Cracks from Returning
Fixing cracks without addressing the cause is temporary maintenance. The pattern repeats until the underlying stress or degradation is resolved.
Three practices consistently stop spider cracks from returning:
- Address root causes before repairing. If cracks reappear, the laminate is still flexing or mounting hardware is still transferring stress. Reinforce the laminate, replace failed hardware, or re-evaluate the support structure — otherwise the gelcoat repair is wasted work.
- Keep the protective topcoat maintained. Breaches in the gelcoat film reduce resistance to UV, water, and corrosion — a finding documented by ACMA. A compatible wax or topcoat applied on schedule keeps the surface from becoming brittle and crack-prone.
- Inspect high-stress areas on a set schedule. Fittings, flanges, brackets, and tank bases carry the most mechanical load. Catching hairline crazing before it propagates is far cheaper than repairing established cracking.
For industrial FRP tanks, inspection intervals are defined by service conditions. FTPI RP 2007-1 recommends trained external inspections every 5 years for aboveground atmospheric tanks in hazardous-substance service, and every 10 years for tanks in other service.
AFTR's periodic inspection programs incorporate non-destructive testing — ultrasonic, laser, and high-intensity backlight methods — to identify developing problems years before they reach structural failure, well beyond what visual inspection alone can detect.
Frequently Asked Questions
Can you gelcoat over spider cracks?
No. Applying new gelcoat directly over unopened cracks without V-grooving first will cause the repair to fail quickly. The existing cracks must be mechanically opened, cleaned, and filled with gelcoat paste before any topcoat is applied.
What causes spider cracks in fiberglass gelcoat?
The most common causes are impact stress, thermal expansion and contraction cycles, structural flex around hardware, and gelcoat applied too thick during manufacturing. Each creates a different crack pattern, which can help identify the underlying issue.
Are spider cracks in gelcoat a sign of serious damage?
Most are cosmetic and surface-only. However, cracks accompanied by soft or spongy laminate, widespread pattern cracking, or those present on structural or industrial vessels warrant professional evaluation before assuming the issue is minor.
What is the best filler for repairing spider cracks in gelcoat?
Gelcoat paste is the correct material. Unlike liquid resin or automotive polyester filler, paste-grade gelcoat bonds chemically with the existing surface, resists shrinkage, and can be sanded and polished to a smooth, polished finish.
How do I match gelcoat color when repairing spider cracks?
For newer structures, contact the original manufacturer with identifying information. For aged surfaces, use a tintable gelcoat base and add pigments incrementally. Always test on scrap material, allow full cure, then wet sand and buff before judging the color match.
When should spider cracks on an industrial FRP tank be professionally inspected?
Any spider cracking on a tank in chemical, potable water, wastewater, or food-grade service should trigger a professional inspection using non-destructive testing. Surface cracking may indicate corrosion barrier compromise or laminate degradation that a cosmetic repair alone will not resolve.