Introduction
A fiberglass pressure tank with a failed bladder presents a clear decision point: replace the bladder or replace the entire tank. Because the FRP shell doesn't corrode, the vessel itself is often structurally sound long after the internal bladder has worn out — making bladder-only replacement the logical, cost-effective choice.
When a bladder fails, the tank becomes waterlogged. Water fills the air chamber, the pump loses its pressure buffer, and short-cycling begins. According to Franklin Electric's AIM Manual, excessive cycling accelerates wear on pressure switches, starters, relays, and capacitors. Delayed bladder replacement doesn't stay contained to the tank — it pulls connected components into an accelerated failure cycle.
This guide covers the complete fiberglass pressure tank bladder replacement process: preparation, safe removal, interior inspection, new bladder installation, precharge, and post-installation validation. It's written for trained maintenance personnel working on industrial, waterworks, or commercial FRP pressure tanks.
Key Takeaways
- Replacement is viable only when the tank has a removable counter-flange and a manufacturer-matched bladder can be sourced
- Inspect the interior FRP laminate while the tank is open — sharp edges or delamination will destroy a new bladder fast
- Match bladder material (EPDM, butyl, or specialty elastomer) to the stored fluid — wrong chemistry means early failure
- Follow the sequence: depressurize → drain → disassemble → inspect → insert → seal → precharge → validate
- Skipping post-installation pressure validation is the most common reason bladder problems go undetected until pump failure
Understanding the Full Replacement Process
Fiberglass pressure tank bladder replacement follows a defined sequence:
- Isolation and depressurization
- Bladder removal
- Interior laminate inspection
- New bladder insertion
- Sealing and precharge
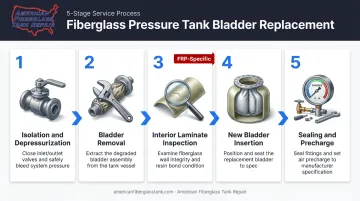
The fiberglass context adds one step not found in steel tank guides: a mandatory interior laminate check while the tank is open.
A trained two-person maintenance team can complete replacement in a few hours on smaller industrial tanks. Larger-diameter vessels may require mechanical assistance for repositioning.
Prerequisites and Safety Considerations
Before ordering a replacement bladder, confirm your tank design allows bladder access. Not all fiberglass pressure tanks have removable covers or counter-flanges: Pentair's WellMate catalog distinguishes between replaceable air-cell models and fixed-membrane designs. Forcing disassembly on a sealed FRP vessel can damage the shell irreversibly.
Replacement bladders are manufacturer-specific. Manufacturers design the flange geometry, sealing surfaces, and fitting dimensions for a specific tank model — confirm the part number against the tank data plate before ordering.
Safety requirements before any disassembly:
- Shut off pump power at the breaker
- Close shutoff valves on both inlet and outlet sides of the tank
- Open a downstream faucet or drain port to relieve system pressure
- Depress the Schrader valve to release the air charge
- Confirm the pressure gauge reads zero before touching any fittings
A waterlogged fiberglass tank holds far more weight than its rated capacity. Don't attempt to move or reposition it without mechanical assistance or adequate personnel. For tanks in chemical service, follow appropriate PPE and chemical exposure protocols for the stored fluid.
Tools and Parts Required
Tools:
- Pipe wrench and adjustable torque wrench
- Teflon tape and pipe thread sealant
- Air compressor with accurate pressure gauge
- Tire-style valve core tool (for Schrader valve)
- Dolly or mechanical lift for larger tanks
Parts:
- Manufacturer-matched replacement bladder (verified against tank data plate)
- Replacement jam nut and elbow connector if worn
- New flange gasket if applicable
For tanks in chemical service, verify bladder material compatibility before ordering. Standard EPDM or butyl suits potable water but is not rated for aggressive chemicals — confirm compatibility with your stored fluid before purchasing.
How to Replace a Fiberglass Pressure Tank Bladder (Step-by-Step)
Skipping the interior inspection or rushing the flange seating (two of the most common shortcuts) drives the majority of premature bladder failures. Work through each step in order — none of them are optional.
Step 1 — Isolate, Depressurize, and Drain
- Disconnect pump power at the breaker panel
- Close inlet and outlet shutoff valves on both sides of the tank
- Open a downstream tap to release system pressure fully
- Depress the Schrader valve on the tank to bleed the air charge completely
- Confirm zero pressure on the gauge before proceeding
- Position the tank so the counter-flange end is accessible — typically at the top or bottom depending on the tank design
Step 2 — Disassemble and Remove the Old Bladder
- Loosen and remove counter-flange bolts
- Extract the counter-flange and set aside
- For dual-attachment bladders, unscrew the bulkhead fitting at the opposite end before attempting removal
- Pull out the old bladder carefully — note its orientation so you can replicate it during installation
- Keep the jam nut and system connection fitting; these are reused
Step 3 — Inspect the FRP Interior
This is the step that separates a successful bladder replacement from one that fails within weeks.
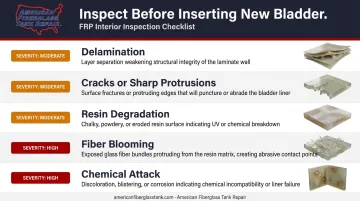
Before inserting the new bladder, inspect the interior surface of the fiberglass shell for:
- Delamination — layers separating from each other
- Cracks or sharp protrusions — these will abrade and rupture a new bladder
- Resin degradation — yellowed or chalky surface that has lost structural integrity
- Fiber blooming — exposed glass fibers indicating resin breakdown
- Chemical attack — discoloration, softening, or surface erosion in chemical service tanks
Sand any sharp edges smooth before proceeding. Any surface rough enough to catch a fingernail can abrade the bladder once it's pressurized.
For industrial, chemical, or waterworks tanks, bladder replacement downtime is also a practical window for a professional laminate inspection. We conduct engineer-driven interior assessments using ultrasonic, laser, and high-intensity backlight testing — catching subsurface issues like capillary fluid migration under the corrosion coat that visual checks miss. All inspections are supervised by Fiberglass Tank & Pipe Institute (FTPI) certified inspectors, and addressing laminate concerns during the same outage avoids scheduling a second shutdown later.
Step 4 — Insert and Seat the New Bladder
- Inspect the replacement bladder for tears, holes, or manufacturing defects before insertion
- Drop the system connection fitting into the bladder
- Roll or fold the bladder vertically and insert it through the tank opening — guide it in without twisting
- For dual-end attachment designs, secure the bulkhead fitting first before seating the counter-flange end
- Align the bladder flange precisely with the tank opening edge — misalignment here creates air leaks at the seal
Step 5 — Reassemble and Precharge
- Reinstall the counter-flange and tighten bolts in a star (cross) pattern to apply even pressure on the flange gasket
- Apply Teflon tape and pipe thread sealant on all threaded connections
- Once sealed, connect an air compressor and precharge the tank
On precharge pressure: The correct precharge varies by system and manufacturer. Pentair WellMate specifies 4 PSI below pump cut-in pressure, while Wessels states 2 PSI below cut-in for home well systems and approximately 10% below cut-in for commercial buildings. Check your pump manufacturer's specification — there is no universal rule.
- Restore shutoff valves and system connections, then gradually bring the system back online
Post-Replacement Checks and Validation
Skipping post-installation validation is how pump damage happens. Pressure checks catch installation errors while they're still easy to fix.
Immediately after pressurizing:
- Check counter-flange bolts for movement or weeping
- Verify the Schrader valve cap is tight
- Apply soapy water to the flange seal area — bubbling indicates an air leak
Functional pressure test:
Monitor the pressure gauge through at least two complete pump cycles. The pump should start and stop cleanly at its cut-in and cut-out set points. Rapid short-cycling at this stage means the bladder isn't holding air charge or isn't seated correctly. Depressurize and investigate before running the system further.
Routine precharge checks:
Most bladder tank manufacturers recommend annual precharge verification at minimum. Check pressure with the pump off and water drained from the tank, following your manufacturer's procedure.
Common Bladder Replacement Problems and Fixes
Even a careful installation can run into setbacks. These are the three most common post-replacement failures — what triggers them and how to resolve each one.
Air Leaks Past the Counter-Flange Seal
Pressure drops at the air valve within hours of installation; soapy water shows bubbling at the flange.
This typically means the bladder flange wasn't seated flush before tightening, or bolts were torqued unevenly rather than in a star pattern.
Resolution: Depressurize and disassemble. Reseat the bladder flange evenly, confirm alignment, and re-torque in a star pattern. Replace the flange gasket if it shows deformation.
Pump Continues Short-Cycling After Replacement
The pump cycles on and off rapidly even with the new bladder installed.
The most common cause is an incorrect air charge — usually because the tank wasn't fully depressurized before precharge. A manufacturing defect or installation damage can also produce the same symptom.
Resolution: Drain the tank completely, re-bleed through the Schrader valve, and recharge to the correct precharge pressure per manufacturer specs. If short-cycling continues, depressurize and inspect the bladder for punctures.
New Bladder Ruptures Within Weeks of Installation
The replacement bladder fails in a short timeframe, requiring another replacement cycle.
Two causes account for most early failures: undetected sharp edges or protrusions inside the FRP vessel causing abrasion, and bladder material that's chemically incompatible with the stored fluid.
Resolution: Remove the failed bladder and thoroughly sand and smooth all interior surfaces. For chemical service tanks, consult the IPEX EPDM & FKM Chemical Resistance Guide or equivalent compatibility data to confirm the correct elastomer for your specific fluid before reinstalling.
Pro Tips for Effective Bladder Replacement
Follow these three practices to reduce downtime, catch problems early, and keep accurate maintenance records:
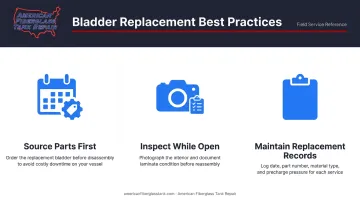
Source the bladder before disassembling the tank. Specialty FRP pressure tank bladders — particularly for discontinued or industrial models — can have long lead times. Opening the tank before confirming parts availability adds unnecessary downtime.
Treat every replacement as a scheduled inspection. While the tank is open, photograph the interior surface and document any laminate concerns in the maintenance log. For chemical, waterworks, or wastewater tanks, coordinate with AFTR to schedule a professional laminate assessment during the same window — they work around shutdowns and night shifts and provide formal condition reports.
Maintain a replacement record. Log the replacement date, bladder part number, material type, and final precharge pressure. This simplifies future replacements and supports warranty claims. Verify precharge pressure annually under normal operating conditions, per Wessels' and Franklin Electric's maintenance guidance.
Conclusion
A fiberglass pressure tank shell doesn't fail from corrosion. Done correctly, bladder replacement returns a structurally sound vessel to full service life — which makes the execution details the only variable that matters.
The steps that make the difference: correct manufacturer-matched sourcing, a thorough interior laminate inspection before the new bladder goes in, careful flange seating with proper torque sequence, and post-installation pressure validation. Skip any of those and the resulting failure costs more than the correct replacement would have.
That logic applies especially to industrial, waterworks, and chemical service tanks — the downtime window is already open, making it the lowest-cost opportunity to get a professional laminate assessment on record. Contact American Fiberglass Tank Repair at 877-427-0090 to schedule FTPI-certified inspection services alongside your next planned maintenance window.
Frequently Asked Questions
Can the bladder in a pressure tank be replaced?
Yes, in most fiberglass pressure tanks that have a removable counter-flange or access cover. Tanks with non-removable membrane designs are not field-serviceable in this way. Check the tank data plate or manufacturer documentation to confirm which design you have before ordering parts.
How long does a pressure tank bladder last?
Lifespan varies based on pressure cycling frequency, fluid type, bladder material, and whether precharge pressure is maintained correctly. Pentair's warranty on WellMate PEU air cells is 5 years — treat that as a maintenance benchmark, not a guaranteed service life.
How do I tell if a pressure tank bladder is bad?
The clearest signs: water spurts from the Schrader air valve when depressed, the pump short-cycles rapidly, or the tank feels abnormally heavy when it should be partially air-charged. If air is escaping through the waterline after setting precharge, the bladder is compromised and needs replacement.
Do fiberglass pressure tanks have bladders?
Most do. Fiberglass pressure tanks used in residential, commercial, and industrial water systems contain an internal bladder or air cell. The FRP outer shell provides corrosion resistance and structural containment; the bladder handles the air-water separation function that maintains system pressure.
What bladder material should I use for a chemical service tank?
Standard EPDM and butyl rubber suit potable water and general water service; chemical applications may require Viton (FKM), PTFE-lined, or other specialty elastomers. Cross-reference the replacement material against chemical compatibility data for your specific fluid, concentration, and operating temperature before ordering.
Should I replace just the bladder or the entire fiberglass pressure tank?
Because FRP shells don't corrode internally, bladder-only replacement is typically the more cost-effective choice when the laminate is structurally sound. Full tank replacement is warranted when interior inspection reveals delamination, chemical attack, or structural cracking that compromises vessel integrity — which is exactly why the interior inspection step matters so much.