The CPSC has documented incidents where filter tank shells separated under pressure, causing injuries. That risk is why repair decisions on these vessels require more care than a typical household fix.
What makes this topic tricky: filter tank damage looks similar on the surface but varies dramatically underneath. A hairline gelcoat crack and a delaminating laminate wall can appear nearly identical until you press on them — and they require completely different responses.
Key Takeaways
- Fiberglass pool filter tanks fail in four predictable ways: surface gelcoat cracks, structural delamination, seal/gasket wear, and fitting damage
- Surface cracks and seal leaks may be field-repairable; laminate-level structural damage requires professional assessment
- Diagnose before you repair — wrong materials or skipped cure time will cause the repair to fail under pressure
- Always fully depressurize before opening or working on the tank — gauge must read 0 PSI
- When structural integrity is in question, get a professional inspection before returning the tank to service
What Is a Fiberglass Pool Filter Tank?
A fiberglass pool filter tank is a closed, pressurized vessel made from fiberglass-reinforced plastic (FRP). It houses the filter media — sand, cartridge, or diatomaceous earth — and operates under continuous internal pressure as the pool pump pushes water through the system.
Major manufacturers including Pentair, Hayward, and Jandy rate their residential fiberglass filter tanks at a maximum working pressure of 50 PSI, while commercial-grade fiberglass filters can be rated considerably higher. The tank must maintain that pressure across thousands of pump cycles, through seasonal temperature swings, UV exposure, and chemical contact.
That's a demanding service environment for any material. FRP holds up well under those conditions, but it does require periodic attention to stay that way.
Why These Tanks Degrade
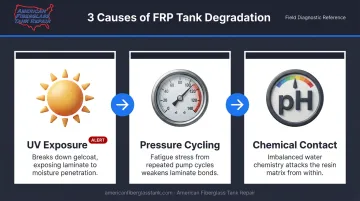
Three forces drive most filter tank deterioration:
- UV exposure breaks down the outer gelcoat layer over time, leading to surface crazing
- Pressure cycling from daily pump operation introduces fatigue stress into the laminate
- Chemical contact — particularly from water outside the ideal pH range — can attack the resin matrix from inside
Pentair notes that worn or damaged components should be replaced immediately — pressure vessel integrity is not something to defer on.
Common Problems With a Fiberglass Pool Filter Tank
Most filter tank failures fit into four categories. Identifying which one you're dealing with before picking up a repair tool is the most important step — it determines whether a surface fix will hold or whether you need structural work.
Here's what distinguishes each type:
Surface Gelcoat Cracks (Spider Cracks)
What you'll see: Hairline web-like cracks on the tank exterior; no active water loss at low pressure; possible cosmetic discoloration around the crack pattern.
What causes them: UV degradation, thermal expansion and contraction cycling, minor physical contact. These cracks affect only the outer gelcoat layer and don't compromise structural integrity on their own — but they create pathways for moisture to reach the underlying laminate if left unaddressed.
Structural Laminate Cracks or Delamination
What you'll see: Cracks that feel soft or flexible when pressed; active water weeping under operating pressure; tank wall feels spongy in localized areas.
What causes them: Long-term pressure cycling fatigue, water ingress into laminate layers, improper original installation, or a significant impact. This is the most serious damage category. Surface epoxy alone cannot fix it.
Leaking O-Rings, Gaskets, or Tank Clamp Seals
What you'll see: Water dripping or pooling at the top closure band, multiport valve base, or bulkhead fittings during pump operation; leaks slow or stop when the pump is off.
What causes them: Rubber seals dry out and crack with age, especially in UV-exposed installations. Chemical imbalance accelerates this. Hayward recommends silicone- or Teflon-based lubricant for O-rings; petroleum-based lubricants degrade rubber and should not be used.
Cracked or Leaking Fittings and Ports
What you'll see: Water dripping from inlet/outlet connections, the pressure gauge port, or the air relief valve. Threads may show visible cracking or stripping.
What causes them: Over-torquing plastic fittings, freeze-thaw cycles, or UV-degraded plastic. Fiberglass threads are brittle — they do not tolerate the same torque as metal connections.
How to Repair a Fiberglass Pool Filter Tank Step by Step
One warning before any work begins: attempting a repair without correctly classifying the damage type risks a failed patch, a pressure failure, or personal injury. The steps below address the most common repairable scenarios. Structurally compromised tanks need professional assessment before you proceed.
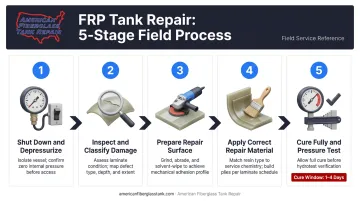
Step 1: Shut Down, Depressurize, and Drain
- Turn off the pool pump and cut power at the breaker
- Open the manual air relief valve on top of the tank to release all internal pressure
- Confirm the gauge reads 0 PSI before touching any fittings or connections — Pentair's installation manuals are explicit: pressurized air can cause the lid to separate from the tank with serious force
- Drain the tank by disconnecting the drain plug or lowest fitting
Step 3 is non-negotiable. Do not touch any fittings until that gauge reads zero.
Step 2: Inspect and Classify the Damage
Examine the entire tank surface in good lighting. Then:
- Press gently around visible cracks — firm resistance suggests gelcoat-only damage; soft, spongy, or flexible areas indicate laminate involvement
- Use food coloring or dye near suspect areas to confirm active leak points
- Document everything with photos before starting any work
If you suspect delamination, professional ultrasonic testing can reveal hidden internal damage that no visual inspection will catch. Companies like American Fiberglass Tank Repair (AFTR) use ultrasonic, laser, and high-intensity backlight testing methods to assess structural condition from the inside.
This matters because capillary migration beneath the corrosion coat is invisible to the naked eye — and patching over it accelerates failure rather than stopping it.
Step 3: Prepare the Repair Surface
For gelcoat or surface cracks:
- Sand the area with 80–120 grit sandpaper to remove the glossy surface and create a mechanical bond profile
- Wipe clean with a lint-free cloth
- Allow to dry completely: moisture beneath the repair material will cause adhesion failure under pressure
- In humid or cold conditions, allow extended drying time
Step 4: Apply the Correct Repair Material
For minor surface (gelcoat-only) cracks: Use a two-part epoxy appropriate for FRP substrates. West System 105 with hardener is a commonly used option; with the 205 Fast Hardener, working strength develops in 1–4 days at 72°F. Press the mixed epoxy into the crack, feather edges smooth, and keep the area protected from moisture during cure.
For fitting and seal leaks:
- Replace O-rings and gaskets with manufacturer-matched parts
- Lubricate with silicone-compatible grease — not petroleum-based
- Apply fresh PTFE tape to threaded connections
- Hand-tighten fittings, then add only a quarter to half turn with a wrench
Over-torquing fiberglass ports is one of the most common causes of new cracks during reassembly. Jandy's installation manuals specifically warn against over-tightening fiberglass fittings.
For structural laminate damage: This goes beyond DIY epoxy patching. Proper structural repair involves grinding back to sound laminate, applying a resin system compatible with the original tank construction (isophthalic polyester, vinylester, or epoxy depending on the original build), and reinstating the laminate schedule with matched fiber weights.
Applying another surface patch over structural laminate damage won't hold under operating pressure. At this stage, call a specialist who can restore the laminate schedule correctly rather than mask the underlying problem.
Step 5: Cure Fully, Then Test Under Pressure
- Reassemble all fittings and seals before restarting
- Bring the system back to operating pressure slowly
- Watch the pressure gauge for unexpected drops
- Inspect all repaired areas for weeping or drips during the first 30–60 minutes
- Monitor for several days before considering the repair complete
West System cure data shows working strength develops in 1–4 days depending on hardener selection and temperature. Returning the tank to service before the repair reaches working strength risks failure under operating pressure.
Should You Repair or Replace Your Fiberglass Filter Tank?
The core question is whether a repair actually restores structural integrity — or just delays a larger problem. A repair that costs more than half the price of a new tank without rebuilding confidence in the vessel rarely makes sense.
Repair is appropriate when:
- Damage is limited to surface gelcoat cracks with no laminate involvement
- Leaks are isolated to fittings or seals with no tank wall cracking
- The tank shows no history of pressure events or chemical overexposure
Replace when:
- Multiple structural cracks are present or delamination is detected in more than one area
- The tank repeatedly develops new cracks after repair
- Wall softening or spongy areas are found in more than one location
- The tank is showing signs of widespread surface degradation
When a tank meets multiple "replace" criteria above, continued patching isn't just ineffective — it's a liability. The CPSC documented a recall of approximately 8,500 pool filters where locking rings could disengage and allow the upper tank shell to blow off under pressure. That hazard is documented and serious.
The inspection gap: Many tank owners cannot tell whether damage is cosmetic or structural without proper testing. An engineer-driven inspection using ultrasonic and high-intensity backlight methods gives you an objective, documented assessment before deciding. AFTR's Fiberglass Tank & Pipe Institute certified inspectors provide exactly that evaluation.
Mistakes to Avoid and How to Prevent Future Damage
Most Consequential Repair Mistakes
- Working on a pressurized tank: the gauge must read 0 PSI before any disassembly
- Using incompatible resin : polyester resin applied over a vinylester tank will not bond reliably. Match the resin type to the original construction.
- Skipping surface prep : applying filler over moisture or contamination guarantees adhesion failure
- Rushing back to service : returning the tank to operating pressure before full cure wastes the repair
- Treating structural damage as cosmetic — a surface patch over a delaminating laminate wall buys time, not a fix
Preventive Steps That Actually Work
These mistakes share a common thread: most are preventable with routine attention. A few low-effort habits stop the majority of recurring damage.
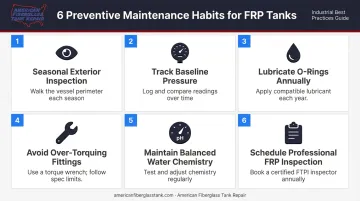
- Inspect the exterior and fittings at the start of each season: look for new spider cracks, fitting weeping, or seal deterioration
- Track your baseline operating pressure and investigate any reading 8–10 PSI above normal — an early warning sign before damage progresses
- Lubricate O-rings and gaskets annually with a silicone-compatible lubricant
- Avoid over-torquing fittings during cleaning cycles — this is a repeat cause of new port cracks
- Maintain balanced water chemistry: fluid below pH 7 accelerates degradation of internal tank surfaces
- Schedule a professional FRP inspection for commercial or high-use systems to catch developing issues before they reach structural failure
Prevention is cheaper than repair. A hairline gelcoat crack caught early is a low-cost surface fix. That same crack left for two seasons — with moisture working into the laminate — can require full tank replacement.
Frequently Asked Questions
What are common mistakes to avoid in fiberglass pool tank repair?
The most consequential errors are skipping depressurization, using an incompatible resin, rushing surface prep, and returning the tank to service before the repair reaches working strength. Any one of these will cause the repair to fail under operating pressure.
Can a cracked fiberglass pool filter tank be repaired, or does it need to be replaced?
Surface gelcoat cracks and isolated seal or fitting leaks are generally repairable. Structural laminate damage, delamination in multiple areas, or a tank that repeatedly cracks after repair typically warrants replacement, since continued patching of a compromised pressure vessel carries real safety risk.
What type of epoxy or resin should I use to repair a fiberglass pool filter tank?
For surface gelcoat cracks, a two-part epoxy such as West System 105 with hardener works for DIY repairs. Structural laminate repair requires a resin matched to the original construction — vinylester or epoxy for most pool-grade FRP tanks. Applying polyester resin over a vinylester laminate causes adhesion failure.
How long does a fiberglass pool filter tank repair need to cure before returning to service?
West System data shows working strength develops in 1–4 days at 72°F depending on the hardener used. Rushing this step risks repair failure under operating pressure. When in doubt, allow the full cure window before pressurizing the system.
How do I know if my fiberglass pool filter tank has structural damage versus a surface crack?
Press around the crack area — a firm crack with no flex suggests gelcoat-only damage, while a soft, spongy, or visibly delaminated area indicates laminate damage. For definitive confirmation, ultrasonic thickness testing by a qualified inspector can detect internal damage that no field test will catch.
When should I call a professional to repair a fiberglass pool filter tank?
Call a professional when delamination is suspected, the tank has multiple crack points, damage is near fittings or structural areas, or the tank operates in a commercial or high-use setting. A professional inspection before committing to repair or replacement can prevent a far more costly failure down the line.