The challenge is that fiber bloom is easy to misread. What looks like surface staining or weathering can indicate that the tank's protective resin layer has already failed — and that deeper laminate damage is underway.
This article explains what fiber bloom is, how to identify which stage it has reached, the step-by-step process for fixing it correctly, and when surface repair alone isn't enough.
Key Takeaways
- Fiber bloom occurs when UV exposure or chemical attack erodes the resin matrix of an FRP tank, leaving raw glass fibers exposed at the surface
- Bloom progresses through three stages: surface chalking, fiber protrusion, and structural laminate involvement — each stage calls for a different response
- Stages 1 and 2 can typically be repaired through surface preparation, resin restoration, and applying a UV-resistant topcoat
- Stage 3 bloom involving the structural laminate usually requires professional assessment, full relining, or tank replacement
- Annual inspections and UV-protective coatings are the most cost-effective way to catch fiber bloom before it reaches critical stages
What Is Fiber Bloom in Fiberglass Tanks?
Fiber bloom is a surface degradation condition in FRP tanks where the resin matrix breaks down — most commonly from prolonged UV exposure — causing the embedded glass fibers to become exposed. The result is a white, chalky, or bristly texture on the outer tank surface that can range from slight roughness to pronounced fiber protrusion depending on how far degradation has progressed.
To understand why this matters structurally, it helps to understand what the resin matrix actually does. In an FRP tank, the resin binds and encases the glass fiber reinforcement, providing chemical resistance, surface protection, and structural cohesion across the laminate. Once that resin layer erodes, the structural skeleton of the tank is directly exposed to the surrounding environment — with no barrier between the glass fibers and whatever conditions the tank is operating in.
Why Does Fiber Bloom Occur?
UV radiation is the primary driver on outdoor or sun-exposed tanks. UV energy attacks chemical bonds in the resin through a process called chain scission, progressively eroding the outer resin layer until the glass fibers beneath it are no longer protected. NIST research on vinyl ester matrix resins confirms that UV radiation can significantly affect the bulk tensile properties of a vinyl ester resin matrix — and peer-reviewed work on glass fiber/polyester composites shows UV radiation's effects are concentrated at the composite surface, which is precisely where fiber bloom begins.
UV degradation isn't the only path to fiber bloom. When stored contents attack the corrosion liner from the inside, similar fiber-exposing degradation can occur on interior surfaces. The mechanism differs from UV-driven bloom, but the outcome — exposed glass fibers, compromised laminate — is just as damaging to structural integrity.
Both failure modes share a common acceleration pattern once fibers are exposed:
- Moisture wicks into the laminate along exposed fiber pathways
- Hydrolysis begins, reducing chemical resistance from the inside out
- Each degradation cycle weakens the resin matrix further, accelerating the next
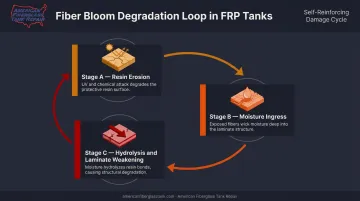
Left unaddressed, what begins as surface roughness can progress to laminate failure — the point at which repair becomes significantly more involved than early-stage intervention.
How to Identify Fiber Bloom: Symptoms and Stages
Fiber bloom follows a predictable staged progression. Identifying which stage a tank has reached determines the entire repair approach — Stage 1 and Stage 3 require fundamentally different interventions.
| Stage | Key Symptom | Resin Status | Repair Complexity |
|---|---|---|---|
| Stage 1 — Surface Chalking | Powdery residue, dull gloss | Eroding but intact | Low — surface treatment |
| Stage 2 — Fiber Protrusion | Rough/bristly texture, exposed fibers | Functionally gone | Moderate — full resin restoration |
| Stage 3 — Deep Laminate Involvement | Blistering, soft spots, delamination | Compromised structurally | High — relining or replacement |
Stage 1 — Surface Chalking
Symptoms:
- White or grey powdery residue on the outer surface
- Slight loss of gloss or color vibrancy
- Surface feels mildly rough when wiped, leaving chalky residue on a cloth
At this stage, the resin is beginning to erode but glass fibers are not yet protruding. This is the most favorable stage to catch: degradation is still reversible with surface treatment, and repair costs are minimal.
Stage 2 — Fiber Protrusion
Symptoms:
- Visible glass fiber ends at the surface
- Texture becomes noticeably rough or bristly — similar to fine sandpaper
- Surface is uncomfortable to handle without gloves
- Moisture absorption has begun in affected areas
The protective resin layer is functionally gone across the affected zones. Repair remains viable, but expect more aggressive substrate preparation and full resin restoration.
Stage 3 — Deep Laminate Involvement
Symptoms:
- Surface blistering, delamination, or soft/spongy spots under pressure
- Visible cracking or crazing extending beyond the surface layer
- Discoloration across multiple laminate layers
- Degradation visible near nozzles, seams, or low-drainage areas
At this stage, the corrosion barrier and potentially the structural laminate have been compromised. Surface repair alone will not restore integrity. Ultrasonic thickness testing per ASTM E797/E797M is needed to measure remaining wall thickness from one side of the tank — the findings determine whether relining or replacement is the right call.
Before calling a repair crew, document what you're seeing. A simple field inspection creates the baseline your technician needs to scope the work accurately.
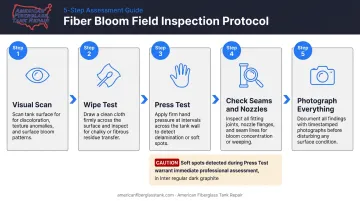
Basic Field Inspection Protocol
- Visual scan — look for chalking, rough patches, or whitening across the tank shell
- Wipe test — run a white cloth across suspected areas; chalky residue confirms active resin erosion
- Press test — gently press suspicious areas for soft or spongy response (warrants immediate professional assessment)
- Check seams and nozzles — blistering concentrates where moisture pools or stress concentrates
- Photograph everything — dated photos establish a baseline before any repair begins
How to Fix Fiber Bloom on an FRP Tank
One of the most common and costly mistakes in fiber bloom repair is applying a topcoat over active surface degradation without properly removing the damaged material first. Adhesion will fail, and degradation continues underneath. Proper repair must address the substrate before any protective layer goes on.
Step 1: Assess Severity and Define the Repair Scope
Determine which stage of fiber bloom is present using the criteria above. For tanks with suspected Stage 3 involvement, instrument-based inspection is essential before you define the repair scope.
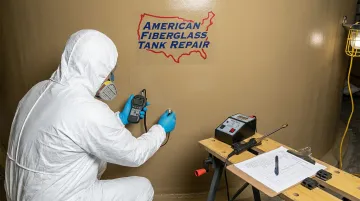
AFTR's FTPI-certified inspectors use ultrasonic, laser, and high-intensity backlight testing methods to evaluate not just surface conditions, but what's occurring inside the structural body of the tank — including capillary migration of liquid product beneath the corrosion coat, which can be underway well before visible symptoms emerge. Accurately diagnosing depth of involvement prevents both under-specifying the fix and over-scoping a repair.
Step 2: Prepare the Surface
The degraded resin and exposed fiber zone must be mechanically removed before repair can proceed:
- Grind or sand all chalked, loose, or delaminated material until a clean, structurally sound substrate is reached
- For localized bloom, a targeted grind-back of the affected area is standard
- For widespread Stage 1–2 bloom, full surface sanding to a uniform profile is typically required
- The surface must be completely dry and free of contamination before any resin is applied
Skipping or shortcutting surface prep is the single most common reason fiber bloom repairs fail prematurely.
Step 3: Restore the Resin Layer
With a clean substrate, new resin is applied to rebuild the eroded surface layer. Resin selection must match the tank's original corrosion barrier specification and the stored chemical:
| Service Environment | Resin Type |
|---|---|
| General chemical service | Isophthalic polyester |
| Moderate chemical aggression | Terephthalic polyester |
| Aggressive chemicals (acids, oxidizers) | Vinylester |
| High-temperature or specialty service | Epoxy |
A surface veil — such as a Nexus or C-veil — is typically applied over the resin to produce a smooth, fiber-free surface and improve chemical and UV resistance. For aggressive stored chemicals like sodium hypochlorite, the veil and resin combination is especially critical — material selection errors here can accelerate rather than prevent future failure.
AFTR works with custom-blended isophthalic, terephthalic polyester, vinylester, and epoxy resins alongside over 45 fiberglass mat and veil laminates — allowing the repair to be matched precisely to the tank's original design specification and current service conditions.
Step 4: Apply a UV-Resistant Protective Topcoat
Once the resin layer has cured, a UV-resistant topcoat or gelcoat re-establishes the protective barrier that was originally lost. This topcoat is the tank's primary defense against future UV degradation — it absorbs and reflects UV energy before it can reach the structural laminate.
For outdoor and sun-exposed tanks, the topcoat formulation should include UV stabilizers such as hydroxyphenylbenzotriazoles or hydroxybenzophenone UV absorbers combined with HALS (hindered amine light stabilizers).
Research in PCI Magazine shows that combining UV absorbers with HALS reduces color change more effectively than UV absorbers alone in polyester gelcoats — worth specifying when the tank sees prolonged direct sun exposure.
Application thickness should follow the resin manufacturer's specification; Interplastic's gel coat guidance recommends 18–22 mils as the standard application range to avoid surface defects. Confirm the specified thickness with your repair contractor based on the product being used.
Step 5: Cure and Validate the Repair
After topcoat application, allow full cure per the resin manufacturer's specifications before returning the tank to service. Then:
- Inspect for pinholes, soft spots, adhesion failure, or uneven coverage
- For chemical service tanks, a spark or holiday test of the repaired area is recommended to confirm coating integrity — note that test configuration must account for FRP being a non-conductive substrate
- Document the completed repair: materials used, resin batch numbers, curing conditions, and dated photographs — this record becomes part of the tank's maintenance file and informs future inspection decisions
Repair vs. Full Restoration: Making the Right Call
Stage 1 and Stage 2 fiber bloom — where degradation is limited to the outer resin and surface fiber layers — is typically addressable through the repair process described above. Early intervention consistently produces the best outcomes and the lowest cost. The ACMA documented a case of six industrial GFRP leachate storage tanks manufactured in 1990 that survived more than 35 years with routine maintenance — the kind of result that proactive repair programs make possible.
Full relining or replacement becomes the appropriate path when:
- Ultrasonic testing reveals wall thickness below design minimums
- The corrosion barrier has been breached and chemical permeation is detected
- Structural laminate delamination is widespread across the tank
- The tank is approaching the end of its design service life
Even when the corrosion barrier has been breached, the structural shell often remains an ideal substrate for a new corrosion layer. Relining rather than replacement is often the better call — and typically costs a fraction of full tank replacement.
That decision — repair, reline, or replace — depends on the tank's age, service history, stored chemical, remaining wall thickness, and cost of downtime. A professional inspection gives you the data to make that call confidently, avoiding both a compromised tank left in service and a premature replacement that wasn't yet necessary.
Preventing Fiber Bloom: Long-Term Protection
The most effective prevention is UV-resistant surface protection applied and maintained from the start. Outdoor tanks should carry a UV-stabilized gelcoat or topcoat, inspected on a set schedule — proactive recoating costs a fraction of what full fiber bloom remediation requires.
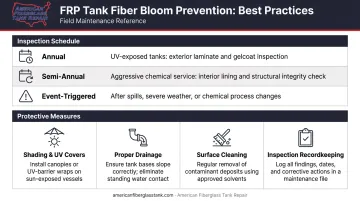
Recommended Inspection Schedule
- Annual visual inspections for tanks in UV-exposed environments, plus targeted checks after extreme weather events
- Semi-annual professional inspections for tanks storing caustic or aggressive chemicals such as sodium hypochlorite, ferric chloride, or hydrochloric acid
- Event-triggered inspections following material spills, extreme weather, or any planned change in stored chemical
FT&V RP 2007-1, the recommended practice for in-service inspections of aboveground atmospheric FRP tanks, sets trained external inspection intervals at every 5 years for hazardous-substance service and every 10 years for tanks over 10,000 gallons in other service. These are minimum intervals, not maximum ones.
Additional Protective Measures
- Install shading or UV-blocking covers on tanks where permanent coatings aren't feasible
- Ensure proper drainage around the tank base to prevent pooling moisture from accelerating bottom-surface degradation
- Clean surfaces regularly to remove dirt, organic buildup, and chemical residue, all of which accelerate resin breakdown
- Keep inspection records for every tank to track degradation trends across the full service life
AFTR supports both periodic maintenance programs and single-event inspections. All inspections are supervised by FTPI-certified inspectors and documented with findings on surface condition, structural integrity, and recommended next steps.
Frequently Asked Questions
What is fiberglass blooming?
Fiber blooming (or fiber bloom) is a degradation condition in FRP materials where UV exposure or chemical attack erodes the resin matrix, exposing the underlying glass fibers as a white, chalky, or bristly surface texture. It indicates the tank's protective surface layer has failed and that moisture ingress into the laminate is underway.
What is the life expectancy of a fiberglass tank?
A well-maintained FRP tank can last 30 years or more. ACMA has documented industrial GFRP tanks still in service after 35+ years with routine maintenance. Unaddressed fiber bloom significantly shortens that lifespan.
Does a fiberglass tank need to be grounded?
FRP tanks are inherently non-conductive, which is an advantage in many applications. Grounding requirements depend on the stored liquid, application, and local codes. Verify with a qualified engineer for your specific installation.
Can fiber bloom on a fiberglass tank be repaired without full replacement?
Stage 1 and Stage 2 fiber bloom can typically be repaired through surface preparation, resin restoration, and UV-topcoat application without replacing the tank. Stage 3 bloom involving structural laminate damage may require full relining or replacement depending on remaining wall thickness as measured by ultrasonic testing.
How can I tell if fiber bloom has affected the structural integrity of my tank?
Surface symptoms alone cannot confirm structural compromise. Ultrasonic thickness testing and high-intensity backlight inspection are needed to measure remaining wall thickness and detect laminate delamination. If the tank feels soft or spongy anywhere, or if blistering is visible near seams or nozzles, seek professional assessment immediately.